How to Install n8n on a VPS Using Docker Compose, Postgres, and Redis
If you want full control over your automation workflows, the best move is to self host n8n on a VPS. You get your own data, no usage caps, and a setup that can grow with you. This guide shows you the whole process from a fresh server to a live n8n instance with PostgreSQL, Redis, Nginx, and HTTPS.
Table of Contents
Why Use PostgreSQL and Redis instead of SQLite for n8n?
The default n8n install uses SQLite, which is a single file on disk. It is fine for testing, but it can get slow or corrupt under heavy use. PostgreSQL is a proper database that handles many connections at once, gives you reliable storage, and is much easier to back up.
Redis handles the job queue. When a workflow is triggered, n8n puts it in the Redis queue instead of running everything in one process. A separate worker picks up jobs from the queue and runs them. This means the n8n editor remains fast and responsive even when dozens of workflows are running simultaneously.
This stack is the best production way to self host n8n on a VPS if you want reliability and space to grow.
What You Need Before Starting to Self Host n8n on a VPS
Before you start the setup, a VPS with Ubuntu 22.04 or 24.04 is recommended. You can start with an Ubuntu Linux Server from PerLod. At least, you need 2 vCPU and 4 GB RAM for a comfortable setup.
Also, you need a domain name pointed at your server’s IP address. You can easily register a domain at PerLod.
Root or sudo SSH access, Docker, and Docker Compose installed on your server are required.
Step 1: Update Your Server and Install Docker
Once your Linux VPS is ready, SSH into your server and run the command below to update your packages:
sudo apt update && sudo apt upgrade -yInstall Docker with the commands below:
curl -fsSL https://get.docker.com | sh
sudo usermod -aG docker $USER
newgrp docker
Check that Docker is working:
docker --version
docker compose version
You should see version numbers for both. If Docker Compose version gives an error, install the plugin:
sudo apt install docker-compose-plugin -yStep 2: Create the Project Folder
At this point, you must create a project folder to keep everything in one place. To do this, run the command below:
mkdir ~/n8n-stack && cd ~/n8n-stackYou will create three files here, including docker-compose.yml, .env, and the Nginx config later.
Step 3: Create the .env File
The .env file holds all your settings and secrets. Using a separate file is cleaner than putting secrets directly in docker-compose.yml. Use your desired text editor to create the file:
nano .envPaste the following configuration and fill in your own values:
# Postgres
POSTGRES_USER=n8n
POSTGRES_PASSWORD=change_this_strong_password
POSTGRES_DB=n8n

# n8n Core
N8N_ENCRYPTION_KEY=generate_a_random_32char_key
N8N_HOST=n8n.yourdomain.com
N8N_PORT=5678
N8N_PROTOCOL=https
WEBHOOK_URL=https://n8n.yourdomain.com/
N8N_PROXY_HOPS=1

# Timezone
GENERIC_TIMEZONE=Asia/Dubai
TZ=Asia/Dubai

# Queue mode
EXECUTIONS_MODE=queue
QUEUE_BULL_REDIS_HOST=redis
QUEUE_BULL_REDIS_PORT=6379

# DB connection for n8n
DB_TYPE=postgresdb
DB_POSTGRESDB_HOST=postgres
DB_POSTGRESDB_PORT=5432
DB_POSTGRESDB_DATABASE=n8n
DB_POSTGRESDB_USER=n8n
DB_POSTGRESDB_PASSWORD=change_this_strong_password
Once you are done, save and close the file.
Note: You can generate a secure encryption key for the N8N_ENCRYPTION_KEY with the command below:
openssl rand -hex 32The N8N_ENCRYPTION_KEY protects all credentials stored in n8n. If you lose it, you lose access to your saved credentials. Back it up somewhere safe.
Step 4: Create the Docker Compose YAML File
This Docker Compose YAML file defines PostgreSQL, Redis, the n8n main process, and a worker. To create the file, use your desired text editor:
nano docker-compose.ymlPaste the following content into the file:
services:

  postgres:
    image: postgres:16-alpine
    restart: unless-stopped
    env_file: .env
    environment:
      - POSTGRES_USER=${POSTGRES_USER}
      - POSTGRES_PASSWORD=${POSTGRES_PASSWORD}
      - POSTGRES_DB=${POSTGRES_DB}
    volumes:
      - pg_data:/var/lib/postgresql/data
    healthcheck:
      test: ['CMD-SHELL', 'pg_isready -h localhost -U ${POSTGRES_USER} -d ${POSTGRES_DB}']
      interval: 5s
      timeout: 5s
      retries: 10

  redis:
    image: redis:7-alpine
    restart: unless-stopped
    volumes:
      - redis_data:/data
    healthcheck:
      test: ['CMD', 'redis-cli', 'ping']
      interval: 5s
      timeout: 5s
      retries: 10

  n8n:
    image: docker.n8n.io/n8nio/n8n:latest
    restart: unless-stopped
    env_file: .env
    ports:
      - "127.0.0.1:5678:5678"
    volumes:
      - n8n_data:/home/node/.n8n
    depends_on:
      postgres:
        condition: service_healthy
      redis:
        condition: service_healthy

  n8n-worker:
    image: docker.n8n.io/n8nio/n8n:latest
    restart: unless-stopped
    env_file: .env
    command: worker
    volumes:
      - n8n_data:/home/node/.n8n
    depends_on:
      postgres:
        condition: service_healthy
      redis:
        condition: service_healthy
      n8n:
        condition: service_started

volumes:
  pg_data:
  redis_data:
  n8n_data:
A few things to notice here:
- The port is bound to
127.0.0.1:5678so n8n is not reachable directly from the internet. Traffic will come through Nginx. - The n8n-worker service uses
command: workerto run as a queue worker, not a second main instance. - Health checks make sure Postgres and Redis are fully ready before n8n tries to connect.
Step 5: Start the n8n Stack
At this point, you can use the command below to start your stack:
docker compose up -d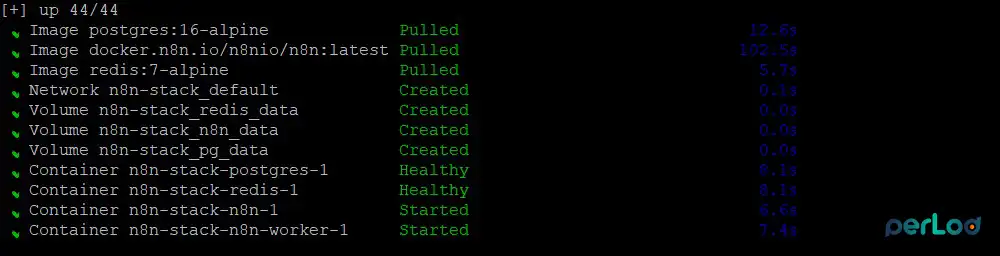
Once you are finished, use the command below to check that all containers are running:
docker compose psYou should see four containers with status Up.
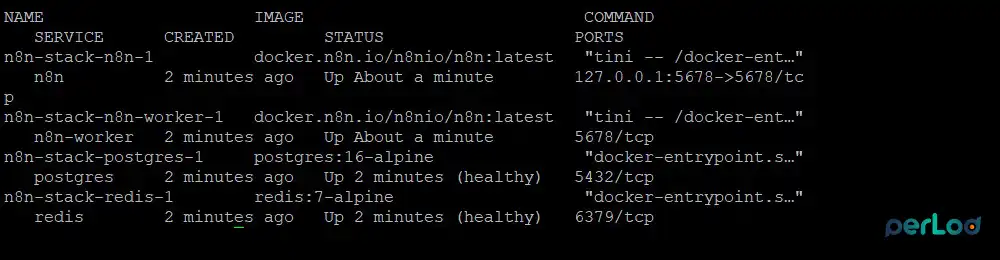
Also, check the n8n logs to confirm it started:
docker compose logs n8nLook for a line like Editor is now accessible via: http://localhost:5678. If you see errors about the database, double-check that the .env passwords match.
Step 6: Install Nginx and Certbot
Now you need to put n8n behind a proper HTTPS reverse proxy. Nginx handles incoming traffic on ports 80 and 443 and passes it to the n8n container.
Install Nginx and Certbot with the command below:
sudo apt install nginx certbot python3-certbot-nginx -yCheck if Nginx is running:
systemctl status nginxStep 7: Configure Nginx as a Reverse Proxy
To configure Nginx as a reverse proxy for n8n, create a new site config with the command below:
sudo nano /etc/nginx/sites-available/n8nPaste this configuration and replace n8n.yourdomain.com with your actual domain:
server {
    listen 80;
    server_name n8n.yourdomain.com;

    location / {
        proxy_pass http://localhost:5678/;
        proxy_http_version 1.1;
        proxy_set_header Upgrade $http_upgrade;
        proxy_set_header Connection "upgrade";
        proxy_set_header Host $host;
        proxy_set_header X-Real-IP $remote_addr;
        proxy_set_header X-Forwarded-For $proxy_add_x_forwarded_for;
        proxy_set_header X-Forwarded-Proto $scheme;
        proxy_read_timeout 3600s;
        proxy_send_timeout 3600s;
        client_max_body_size 50M;
    }
}
Save and close the file. Enable the site and test the config with the commands below:
sudo ln -s /etc/nginx/sites-available/n8n /etc/nginx/sites-enabled/
sudo nginx -t
sudo systemctl reload nginx
Step 8: Get a Free SSL Certificate
To self host n8n on a VPS, make sure your domain’s DNS A record points to your server IP, then run the command below to get a free SSL certificate:
sudo certbot --nginx -d n8n.yourdomain.comCertbot will ask for your email, agree to the terms, and then automatically update your Nginx config with SSL settings.
After it finishes, visit https://n8n.yourdomain.com in your browser. You should see the n8n setup screen.
Certificates renew automatically every 90 days. You can verify the renewal timer is active with the command below:
systemctl list-timers | grep certbotStep 9: Configure the Firewall Rules
It is recommended to harden your server so that only the right ports are open. If you are using UFW, use the commands below to allow the required ports:
sudo apt install ufw -y
sudo ufw allow ssh
sudo ufw allow 80
sudo ufw allow 443
sudo ufw enable
Do not open port 5678 publicly. n8n should only be reachable through Nginx.
Step 10: Complete the n8n Setup
At this point, you can open https://n8n.yourdomain.com in your browser. You will see a registration screen. From there, create your owner account with a strong password.
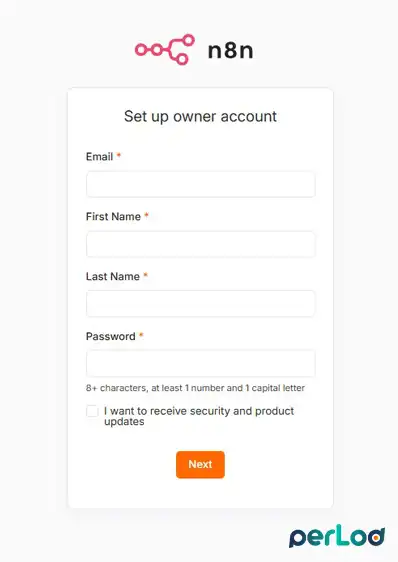
That is it, you have successfully self host n8n on a VPS with Docker Compose, PostgreSQL, Redis, and HTTPS.
Keep n8n Updated and Back Up Your Data
To keep n8n updated, you can pull the latest image and restart the stack:
cd ~/n8n-stack
docker compose pull
docker compose down
docker compose up -d
The current stable version is 2.21.5. Always check the n8n changelog before updating on a production instance.
Also, it is recommended to back up both your PostgreSQL database and the .env file regularly.
Backup PostgreSQL:
docker compose exec postgres pg_dump -U n8n n8n > backup_$(date +%Y%m%d).sqlRestore from backup:
docker compose exec -T postgres psql -U n8n n8n < backup_20260101.sqlStore backups off-server, such as in object storage, an external drive, or another VPS.
Conclusion
Self-hosting n8n gives you full control over your automation workflows with no monthly limits, no vendor lock-in, and your data staying on your own server. By using Docker Compose with PostgreSQL and Redis, you get a setup that is stable, easy to back up, and ready to scale.
The stack in this guide is the right way to self host n8n on a VPS when you actually care about uptime and growth.
Note: If you are still deciding on a server and want more details on picking the right spec, the Linux VPS for n8n guide covers the hardware comparison in depth.
n8n is a great tool, but it is not the only open-source automation platform. If you want to compare options, you can check this breakdown of the best n8n alternatives for self-hosting.
FAQs
Do I need a domain name to self host n8n on a VPS?
Yes. You need a domain to get an SSL certificate and use webhooks with external services properly.
Is it safe to expose n8n port 5678 directly?
No. Always put n8n behind Nginx and keep port 5678 bound to 127.0.0.1 only.
Where are my n8n workflow data and credentials stored?
All workflow definitions, execution history, and credentials are stored in the PostgreSQL database. The n8n_data Docker volume stores encryption keys and logs.

