How to Install RabbitMQ with Docker Compose, Durable Queues, and the Management UI
If you need a simple way to run background jobs, process tasks, or connect services, RabbitMQ is a strong option. In this guide, RabbitMQ durable queues with Docker Compose is the setup you will build, and it gives you a practical RabbitMQ install with persistent data, a web dashboard, and a real producer-consumer test.
Table of Contents
Why RabbitMQ is Useful and What Durability Means?
RabbitMQ is a message broker that lets one app send work and another app process it later. This helps when you do not want your web app to wait for slow jobs like sending emails, processing uploads, or running reports. A producer sends the message, RabbitMQ stores it in a queue, and a consumer reads it when ready. That is why RabbitMQ durable queues with Docker Compose are useful for real apps, not just test labs.
A durable queue means the queue definition survives a RabbitMQ restart. A persistent message means the message is written to disk so it can survive a restart, too.
A durable queue alone does not fully protect messages. To make RabbitMQ durable queues with Docker Compose work correctly, you need a durable queue and persistent messages together.
Prerequisites for RabbitMQ Durable Queues with Docker Compose
Before you start RabbitMQ durable queues with Docker Compose setup, make sure you have these packages installed on your server:
- Docker version 20 or newer.
- Docker Compose v2, which is included as the modern Docker Compose plugin.
- Python 3 and pip for the test scripts.
Check them with:
docker --version
docker compose version
python3 --version
pip3 --version
If you want to run this on a cloud server, an SSD Linux VPS plan is a good option for RabbitMQ workloads.
Step 1. Create the Project Folder for RabbitMQ
First, you must create a project folder and switch to it with the commands below:
mkdir -p ~/rabbitmq-setup/app
cd ~/rabbitmq-setup
This keeps Docker files and Python test files in one place.
Step 2. Create the RabbitMQ Docker Compose and Env Files
Now inside the setup project directory, create the Docker Compose YAML file for RabbitMQ:
vi docker-compose.ymlAdd the following content to the file:
services:
  rabbitmq:
    image: rabbitmq:4-management
    container_name: rabbitmq
    hostname: my-rabbit
    restart: unless-stopped
    ports:
      - "5672:5672"
      - "15672:15672"
    environment:
      RABBITMQ_DEFAULT_USER: ${RABBITMQ_USER}
      RABBITMQ_DEFAULT_PASS: ${RABBITMQ_PASS}
    volumes:
      - rabbitmq_data:/var/lib/rabbitmq
    healthcheck:
      test: ["CMD", "rabbitmq-diagnostics", "-q", "ping"]
      interval: 30s
      timeout: 10s
      retries: 5
      start_period: 30s

volumes:
  rabbitmq_data:
This setup uses the RabbitMQ image with the management plugin included. The named volume stores RabbitMQ data under /var/lib/rabbitmq, which is needed if you want data to survive container recreation.
The hostname is helpful because RabbitMQ uses node names tied to hostnames, and that keeps the node identity stable in Docker setups. This is one reason RabbitMQ durable queues with Docker Compose work better with a fixed hostname than with random container names.
Then, create the .env file:
vi .envAdd the following lines to the file and use a strong password for it:
RABBITMQ_USER=admin
RABBITMQ_PASS=StrongPassword123!
Docker Compose reads this file and passes the values into the container at startup.
Step 3. Start RabbitMQ and Access Management UI
To start RabbitMQ, bring up the container:
docker compose up -dCheck the container:
docker psIf needed, you can watch the logs:
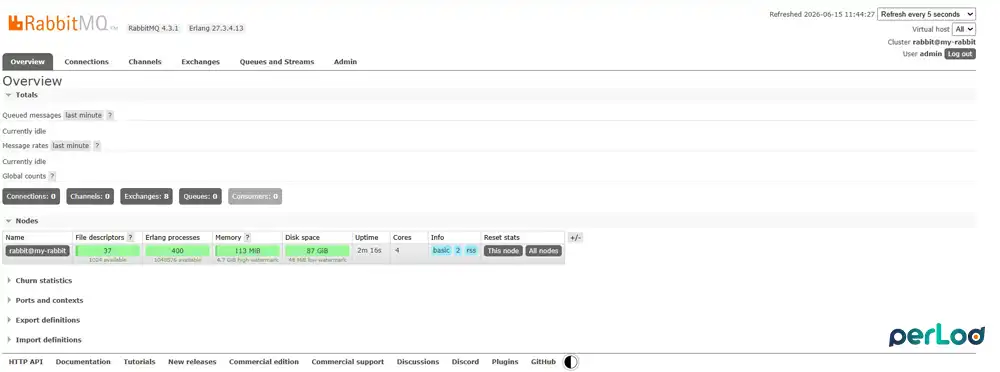
docker compose logs -f rabbitmqWhen the service is up, open the management UI in your browser:
http://YOUR_SERVER_IP:15672Log in with the username and password from the .env file.

The management UI is included in the management image tag and lets you inspect queues, exchanges, and connections from the browser.
Step 4. Set up RabbitMQ Durable Queues
At this point, you can use Python and Pika, the Python RabbitMQ client, to test the setup. This is the part that makes RabbitMQ durable queues with Docker Compose practical for real workers.
First, move into the app folder inside the setup directory:
cd ~/rabbitmq-setup/appCreate a virtual environment and activate it with:
python3 -m venv venv
source venv/bin/activate
Install pika inside the environment:
python3 -m pip install --upgrade pip
python3 -m pip install pika
Using python3 -m pip helps ensure pika is installed in the same Python environment you use to run the scripts. This fixes common errors like ModuleNotFoundError: No module named 'pika'.
Check that it worked:
python3 -c "import pika; print(pika.__version__)"Inside the environment, create the producer.py:
vi producer.pyAdd the following content with your credentials:
import pika
import json

RABBITMQ_USER = "admin"
RABBITMQ_PASS = "StrongPassword123!"
RABBITMQ_HOST = "localhost"
RABBITMQ_PORT = 5672

credentials = pika.PlainCredentials(RABBITMQ_USER, RABBITMQ_PASS)
params = pika.ConnectionParameters(
    host=RABBITMQ_HOST,
    port=RABBITMQ_PORT,
    credentials=credentials,
)

connection = pika.BlockingConnection(params)
channel = connection.channel()

channel.queue_declare(queue="task_queue", durable=True)

message = json.dumps({"task": "send_email", "to": "us**@*****le.com"})

channel.basic_publish(
    exchange="",
    routing_key="task_queue",
    body=message,
    properties=pika.BasicProperties(
        delivery_mode=2,
    ),
)

print(f" [x] Sent: {message}")
connection.close()
This sends a single persistent message to a durable queue. This is the core of RabbitMQ durable queues with Docker Compose in a real app flow.
Then, create the consumer.py:
vi consumer.py:Add the following content with your credentials:
import pika
import json

RABBITMQ_USER = "admin"
RABBITMQ_PASS = "StrongPassword123!"
RABBITMQ_HOST = "localhost"
RABBITMQ_PORT = 5672

credentials = pika.PlainCredentials(RABBITMQ_USER, RABBITMQ_PASS)
params = pika.ConnectionParameters(
    host=RABBITMQ_HOST,
    port=RABBITMQ_PORT,
    credentials=credentials,
)

connection = pika.BlockingConnection(params)
channel = connection.channel()

channel.queue_declare(queue="task_queue", durable=True)
channel.basic_qos(prefetch_count=1)

def callback(ch, method, properties, body):
    data = json.loads(body)
    print(f" [x] Processing: {data}")
    ch.basic_ack(delivery_tag=method.delivery_tag)
    print(" [✓] Done")

channel.basic_consume(queue="task_queue", on_message_callback=callback)

print(" [*] Waiting for messages. To exit press CTRL+C")
channel.start_consuming()
basic_qos(prefetch_count=1) helps RabbitMQ send one unacked message at a time to this worker, which is useful for fair dispatch in work queue patterns. The basic_ack call tells RabbitMQ to remove the message only after the consumer finishes processing it.
Step 5. Run the Test
To run the test, open another terminal and run the commands below:
cd ~/rabbitmq-setup/app
source venv/bin/activate
python3 consumer.py
In your output, you should see:
[*] Waiting for messages. To exit press CTRL+CAgain, open another terminal, and run these commands:
cd ~/rabbitmq-setup/app
source venv/bin/activate
python3 producer.py
In the output, you should see:
[x] Sent: {"task": "send_email", "to": "us**@*****le.com"}Back in the consumer terminal, you should now see:
[x] Processing: {'task': 'send_email', 'to': 'us**@*****le.com'}
[✓] Done
This confirms that the producer and consumer both worked correctly. It also confirms RabbitMQ durable queues with Docker Compose are not just installed, but are working as a real message flow.
Also, you can verify it from the management UI:
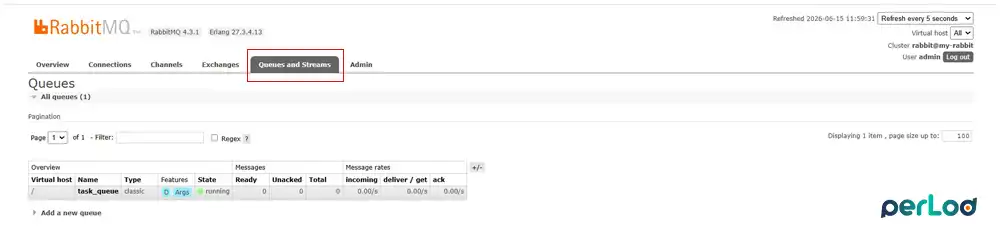
The Type classic and State is running means the queue is active.
Step 6. Restart Test for Durability
To test durability, first run the producer while the consumer is not running:
cd ~/rabbitmq-setup/app
source venv/bin/activate
python3 producer.py
Now restart RabbitMQ:
cd ~/rabbitmq-setup
docker compose restart rabbitmq
Then start the consumer again:
cd ~/rabbitmq-setup/app
source venv/bin/activate
python3 consumer.py
If the message is still processed after the restart, the setup worked as expected. This proves the value of RabbitMQ durable queues with Docker Compose when the queue is durable, and the message is published as persistent.
Basic RabbitMQ Management in Docker
These commands are enough for most basic RabbitMQ management in Docker:
# Start the service
docker compose up -d

# View logs
docker compose logs -f rabbitmq

# Restart RabbitMQ
docker compose restart rabbitmq

# Stop everything
docker compose down

# Stop and delete the volume data
docker compose down -v

# Check container status
docker ps
Which RabbitMQ Ports Should Stay Private
RabbitMQ uses different ports for different jobs. In a real server setup, not all of them should be public:
| Port | Use | Should it stay private? |
|---|---|---|
| 5672 | AMQP app traffic | Yes, only app servers should reach it. |
| 5671 | AMQP over TLS | Yes, only app servers should reach it. |
| 15672 | Management UI | Yes, only trusted IPs should reach it. |
| 25672 | RabbitMQ node and CLI communication | Yes, internal only. |
| 4369 | Erlang port mapper | Yes, internal only. |
For production, keep 15672, 25672, and 4369 private. Even 5672 should not be open to the whole internet unless you really need that, and protect it properly.
If you expect high throughput or heavy worker traffic, an enterprise dedicated server gives you more control over CPU, RAM, disk, and firewall rules.
Conclusion
RabbitMQ durable queues with Docker Compose give you a practical setup for real apps that need background work, async jobs, or message-based communication. The important part is not just running RabbitMQ, but understanding that durable queues keep the queue definition, persistent messages protect the data, and the management UI helps you verify everything in one place.
We hope you enjoy this guide. For the official details on how RabbitMQ stores persistent and transient messages, read the RabbitMQ persistence documentation.
FAQs
What does a RabbitMQ durable queue do?
A durable queue survives a RabbitMQ restart.
Should I expose the RabbitMQ management UI publicly?
No, it should stay private and only be reachable by trusted IPs or internal access paths.
Which port is used by RabbitMQ apps?
Most apps connect to RabbitMQ on port 5672 for AMQP.
