How to Install Gitea with Docker Compose and Add a Self-Hosted Actions Runner
If you want to run your own Git server and CI/CD pipeline without depending on GitHub or GitLab, Gitea self-hosted CI/CD Docker Compose is one of the best setups you can build. In this guide, you will learn a fully working self-hosted developer platform, including Git hosting, persistent storage, SMTP email, HTTPS, and an Actions runner, all running on your own server.
Table of Contents
What You Will Need for Gitea self-hosted CI/CD Docker Compose Setup
Before you start, make sure your server has the following:
- A Linux VPS or dedicated server running Ubuntu 24.04. A reliable Linux VPS works perfectly for this setup.
- Docker and Docker Compose are installed on your server.
- A domain name that is pointed at your server’s IP address.
- Ports 80, 443, and 222 are open in your firewall.
Verify that Docker is installed correctly:
docker --version
docker compose version
Step 1. Create Project Directory and Gitea Docker Compose File
First, make a folder for the stack and move into it:
mkdir -p ~/gitea
cd ~/gitea
Then, create the main Gitea self-hosted CI/CD Docker Compose file. It uses PostgreSQL, persistent storage, and the Gitea environment variables for server, database, Actions, and SMTP settings.
vi docker-compose.ymlnetworks:
gitea:
external: false
services:
db:
image: postgres:16
container_name: gitea-db
restart: unless-stopped
networks:
- gitea
environment:
- POSTGRES_USER=gitea
- POSTGRES_PASSWORD=change_this_strong_password
- POSTGRES_DB=gitea
volumes:
- ./postgres-data:/var/lib/postgresql/data
gitea:
image: gitea/gitea:1.26.1
container_name: gitea
restart: unless-stopped
depends_on:
- db
networks:
- gitea
environment:
- USER_UID=1000
- USER_GID=1000
- GITEA__server__DOMAIN=your.domain.com
- GITEA__server__SSH_DOMAIN=your.domain.com
- GITEA__server__ROOT_URL=http://your.domain.com/
- GITEA__server__HTTP_PORT=3000
- GITEA__server__SSH_PORT=22
- GITEA__server__SSH_LISTEN_PORT=22
- GITEA__database__DB_TYPE=postgres
- GITEA__database__HOST=db:5432
- GITEA__database__NAME=gitea
- GITEA__database__USER=gitea
- GITEA__database__PASSWD=change_this_strong_password
- GITEA__actions__ENABLED=true
- GITEA__actions__DEFAULT_ACTIONS_URL=https://github.com
- GITEA__mailer__ENABLED=true
- GITEA__mailer__FROM=gi***@*********in.com
- GITEA__mailer__PROTOCOL=smtps
- GITEA__mailer__SMTP_ADDR=smtp.yourmailprovider.com
- GITEA__mailer__SMTP_PORT=465
- GITEA__mailer__USER=gi***@*********in.com
- GITEA__mailer__PASSWD=your_smtp_password
ports:
- "127.0.0.1:3000:3000"
- "222:22"
volumes:
- ./gitea-data:/data
- /etc/timezone:/etc/timezone:ro
- /etc/localtime:/etc/localtime:roReplace the domain, passwords, and SMTP values before you start the stack. The mounted folders keep your data safe across container restarts because Gitea stores data in /data and PostgreSQL stores data in its data directory.
Step 2. Start Gitea Docker Compose
At this point, you can start the containers with:
docker compose up -dIf needed, check the logs with:
docker compose logs -f giteaYou can open your browser and navigate to the URL below:
http://your.domain.comStep 3. Set up Nginx Reverse Proxy and HTTPS for Gitea
First, you must start with a simple port 80 reverse proxy. This avoids the common Certbot problem where Nginx fails because SSL files do not exist yet.
Install Nginx and Certbot:
apt install nginx -y
snap install --classic certbot
ln -s /snap/bin/certbot /usr/bin/certbot
Create the Nginx config file for Gitea:
vi /etc/nginx/sites-available/giteaAdd the following content with your domain:
server {
    listen 80;
    listen [::]:80;
    server_name your.domain.com;

    client_max_body_size 512M;

    location / {
        proxy_pass http://127.0.0.1:3000;
        proxy_redirect off;

        proxy_set_header Host $host;
        proxy_set_header X-Real-IP $remote_addr;
        proxy_set_header X-Forwarded-For $proxy_add_x_forwarded_for;
        proxy_set_header X-Forwarded-Proto $scheme;

        proxy_http_version 1.1;
        proxy_read_timeout 900;
    }
}
Enable the site and test it:
ln -s /etc/nginx/sites-available/gitea /etc/nginx/sites-enabled/gitea
nginx -t
systemctl reload nginx
This simple block is enough to proxy requests to Gitea on port 3000 and matches the normal Nginx reverse proxy pattern for Gitea.
To add HTTPS, you must request the certificate with certbot:
sudo certbot --nginx -d your.domain.comAfter Certbot finishes, test again:
sudo nginx -t
sudo systemctl reload nginx
At this point, update Gitea so the public URL uses HTTPS. Edit docker-compose.yml and change:
- GITEA__server__ROOT_URL=https://your.domain.com/Then restart Gitea:
docker compose up -dStep 4. Access Gitea Web UI and Enable Gitea Actions
At this point, you can open your browser and open Gitea:
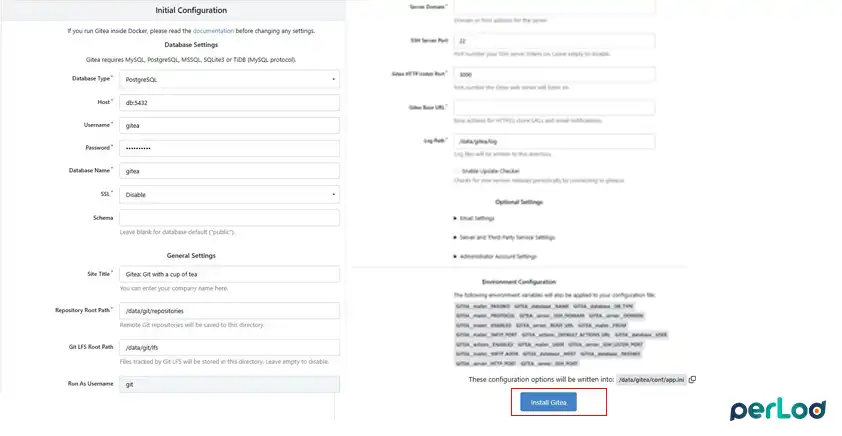
https://your.domain.comSince the database and most settings are already passed in by environment variables, the first setup is much easier. Click Install Gitea.
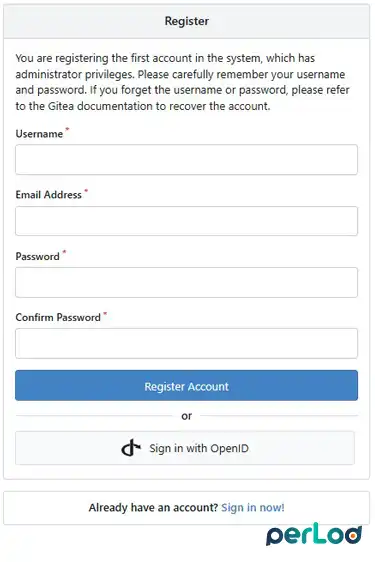
After this, you must register an admin account:
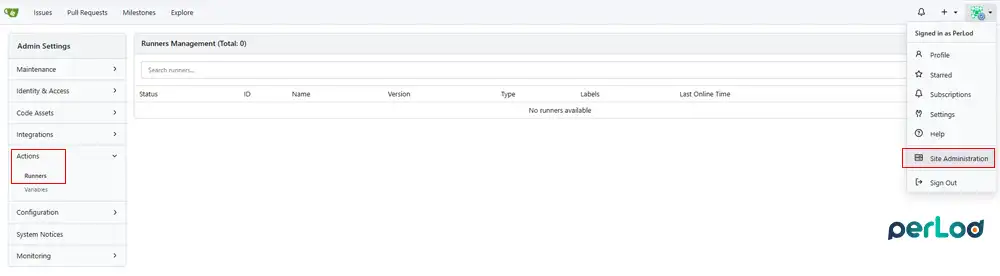
Now you will see your Gitea dashboard. Gitea Actions has been available as a built-in feature since Gitea 1.19, so you do not need an extra CI server for basic workflows.
Because the Compose file already includes this line, Actions is enabled:
- GITEA__actions__ENABLED=trueYou can confirm it from the Gitea admin side under Site Administration → Actions → Runners.
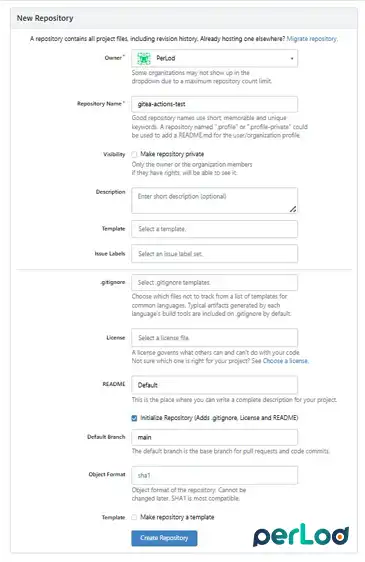
Step 5. Create a Gitea Test Repository
To test Gitea self-hosted CI/CD Docker Compose, create a new repository in the web UI. The easiest way is to initialize it with a README, because a repository without its first commit cannot create files in the web UI.
You can use these simple settings:
- Owner: your user or organization.
- Repository Name: gitea-actions-test.
- Visibility: public for easier testing, or private if you prefer.
- Check Initialize Repository so Gitea creates the first commit.
- Default Branch: main.
- Leave template, issue labels, license, and .gitignore blank if this is only for testing.
This is the easiest way to get a test repo ready for your first workflow.
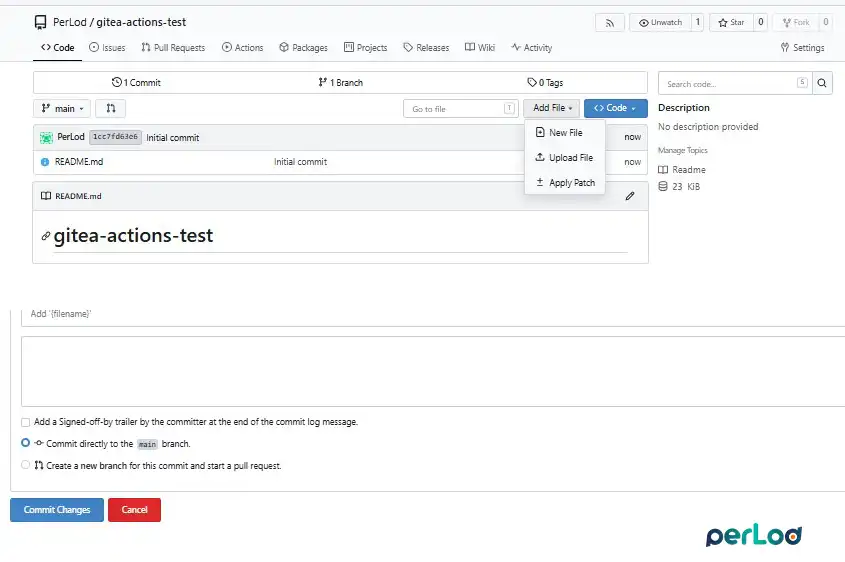
Step 6. Create the Workflow File in Gitea
Workflow files should be stored in .gitea/workflows/ inside the repository, and Gitea reads .yml or .yaml files from that folder.
In the repository:
Click Add File or New File. Use this exact file path:
.gitea/workflows/ci.ymlPaste this content:
name: CI Pipeline

on:
  push:
    branches:
      - main
  pull_request:

jobs:
  build-and-test:
    runs-on: self-hosted
    steps:
      - name: Checkout code
        uses: actions/checkout@v4

      - name: Show environment info
        run: |
          echo "Running on $(uname -a)"
          echo "Working directory: $(pwd)"
          echo "Commit: ${{ gitea.sha }}"

      - name: Run tests
        run: |
          echo "All tests passed!"
Then, commit the file to main. The first commit to this file should trigger a workflow run because the workflow listens for pushes to the main branch.
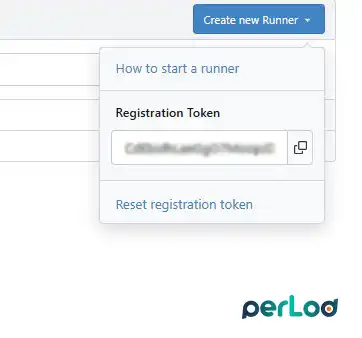
Step 7. Add the Self-hosted Runner
This is where Gitea self-hosted CI/CD Docker Compose becomes a full working platform. Gitea Runner 1.0.0 replaced the older act_runner naming, and the Docker image is now gitea/runner.
First, create a runner registration token in Gitea:
- Log in as admin.
- Open Site Administration.
- Go to Actions → Runners.
- Click Create New Runner.
- Copy the registration token.
Now add this runner service to your docker-compose.yml under services::
  runner:
    image: gitea/runner:1.0.0
    container_name: gitea-runner
    restart: unless-stopped
    depends_on:
      - gitea
    networks:
      - gitea
    volumes:
      - /var/run/docker.sock:/var/run/docker.sock
      - ./runner-data:/data
    environment:
      - GITEA_INSTANCE_URL=http://gitea:3000
      - GITEA_RUNNER_REGISTRATION_TOKEN=PASTE_YOUR_TOKEN_HERE
      - GITEA_RUNNER_NAME=my-self-hosted-runner
This runner uses the internal Docker service name gitea:3000, not the public domain. Putting both services on the same Docker network is important so the runner can reach Gitea correctly.
Start the runner:
docker compose up -d runnerStep 8. Test the First Workflow
After the runner is online, go back to your test repository and open the Actions tab. You should see the workflow run created by the commit that added .gitea/workflows/ci.yml.
If the workflow shows a quick failure with a red warning icon, click the run and then open the job logs. The first error usually comes from one of these:
- Workflow YAML syntax issue.
- No runner matched the label self-hosted.
- Runner is offline.
- The runner cannot reach the Gitea instance.
The fastest checks are:
- Open Site Administration → Actions → Runners and make sure the runner is Online.
- Confirm the job uses
runs-on: self-hosted. - Make sure the workflow file is inside
.gitea/workflows/.
Security Note about Docker Socket Access in Gitea Runner
The simplest runner setup mounts /var/run/docker.sock into the runner container so build jobs can start sibling containers. This is common, but it also means workflows can get high access to the Docker host if you run untrusted code.
Use these safety rules:
- Only run trusted repositories on that runner.
- Do not give public users a way to run optional workflows.
- Keep the runner limited to the repos you trust.
Keep Gitea updated because security fixes continue to land in new releases. To update the containers, you can use:
cd ~/gitea
docker compose pull
docker compose up -d
For production, it is smarter to isolate the runner on a separate host. A high‑performance server is a better option if you want stronger isolation for CI jobs.
Conclusion
Now you have a complete Gitea self-hosted CI/CD Docker Compose platform, including Gitea, PostgreSQL, persistent storage, SMTP, Nginx, HTTPS, and a self-hosted runner. This setup gives you a private Git and CI system you control, and it is easy to grow from one test repo into a real internal developer platform.
We hope you enjoy this guide. For the official workflow file location and first Actions example, you can check the Gitea Actions Quick Start.
FAQs
Do I need a runner to use Gitea?
No. Gitea works fine as a Git server without a runner. The runner is only needed when you want to use Gitea Actions for CI/CD.
Why should I initialize the Gitea repository with a README?
Because a repo without its first commit cannot create files from the web UI, adding a README makes the workflow setup much easier.
Can I reuse GitHub Actions syntax?
Yes. Gitea Actions is designed to be compatible with GitHub Actions-style workflows in many common cases.
