How to Turn n8n Workflows into MCP Tools with the MCP Server Trigger
A proper n8n MCP Server Trigger setup lets you expose only the workflows and tools you choose to AI clients like Claude Desktop, Cursor, or your own custom agents, instead of giving them unrestricted access to your entire n8n instance.
This guide shows the complete n8n MCP Server Trigger setup, from installing n8n to configuring authentication, HTTPS, tool schemas, and connection testing.
Table of Contents
What Is the MCP Server Trigger
The MCP Server Trigger node lets n8n act as a Model Context Protocol (MCP) server, making selected n8n tools and workflows available to MCP clients. Unlike regular trigger nodes that activate on events and pass data downstream, this node only connects to and executes attached tool nodes, so MCP clients can list available tools and call them individually.
This is the foundation of every n8n MCP Server Trigger setup, because it defines exactly which capabilities your automations expose to the outside world.
It supports Server-Sent Events (SSE) and streamable HTTP transports, but does not currently support stdio transport directly, which is why bridge tools like mcp-remote exist for desktop clients.
Prerequisites for n8n MCP Server Trigger Setup
Before starting your n8n MCP Server Trigger setup, you need a self-hosted n8n instance reachable over HTTPS, since MCP clients require a stable public or private URL to connect to. Running n8n on a dedicated Linux VPS gives you full control over ports, reverse proxy configuration, and TLS certificates, which matters a lot for a reliable n8n MCP Server Trigger setup.
- A Linux VPS with at least 2 vCPUs and 4GB RAM.
- Docker and Docker Compose are installed.
- A domain or subdomain is pointed to your VPS IP.
- A reverse proxy for HTTPS termination.
- n8n is already self-hosted.
Tip: You can check this guide on self-hosted n8n on a VPS guide if you haven’t done this yet.
Step 1. Configure the Nginx Reverse Proxy
Install Nginx with the command below:
sudo apt install nginx -yAllow required firewall ports:
sudo ufw allow ssh
sudo ufw allow 80
sudo ufw allow 443
sudo ufw enable
Then, create the Nginx site file with only a plain HTTP server block:
sudo nano /etc/nginx/sites-available/n8n.confAdd this config with your actual domain:
server {
    listen 80;
    server_name n8n.yourdomain.com;

    location / {
        proxy_pass http://127.0.0.1:5678;
        proxy_http_version 1.1;
        proxy_set_header Upgrade $http_upgrade;
        proxy_set_header Connection "upgrade";
        proxy_set_header Host $host;
        proxy_set_header X-Real-IP $remote_addr;
        proxy_set_header X-Forwarded-For $proxy_add_x_forwarded_for;
        proxy_set_header X-Forwarded-Proto $scheme;
    }
}
Once you are done, enable the site and test:
sudo ln -s /etc/nginx/sites-available/n8n.conf /etc/nginx/sites-enabled/
sudo rm -f /etc/nginx/sites-enabled/default
sudo nginx -t
sudo systemctl reload nginx
Install Certbot and request the SSL certificate:
sudo apt install certbot python3-certbot-nginx -y
sudo certbot --nginx -d n8n.yourdomain.com
Only after the certificate exists and the 443 block is in place, edit the file again to insert the dedicated /mcp/ location above the general location / block:
sudo nano /etc/nginx/sites-available/n8n.confAdd this above the location / block:
location /mcp/ {
    proxy_pass http://127.0.0.1:5678;
    proxy_http_version 1.1;

    proxy_buffering off;
    proxy_cache off;
    gzip off;
    chunked_transfer_encoding off;
    proxy_set_header Connection '';

    proxy_set_header Host $host;
    proxy_set_header X-Real-IP $remote_addr;
    proxy_set_header X-Forwarded-For $proxy_add_x_forwarded_for;
    proxy_set_header X-Forwarded-Proto $scheme;

    proxy_read_timeout 3600s;
    proxy_send_timeout 3600s;
}
Test and reload Nginx:
sudo nginx -t
sudo systemctl reload nginx
Let’s Encrypt certificates expire every 90 days, so confirm the renewal timer works without manual intervention:
sudo certbot renew --dry-runGetting HTTPS and the /mcp/ block right is non-negotiable for a stable n8n MCP Server Trigger setup, since MCP clients will refuse or drop insecure or buffered connections.
Access your n8n instance:
https://n8n.yourdomain.comStep 2. Build the MCP Server Workflow
Create a new workflow and rename it something clear, like “MCP Tool Server.” Click the + on the blank canvas, search for “MCP Server Trigger,” and add it as your entry point.
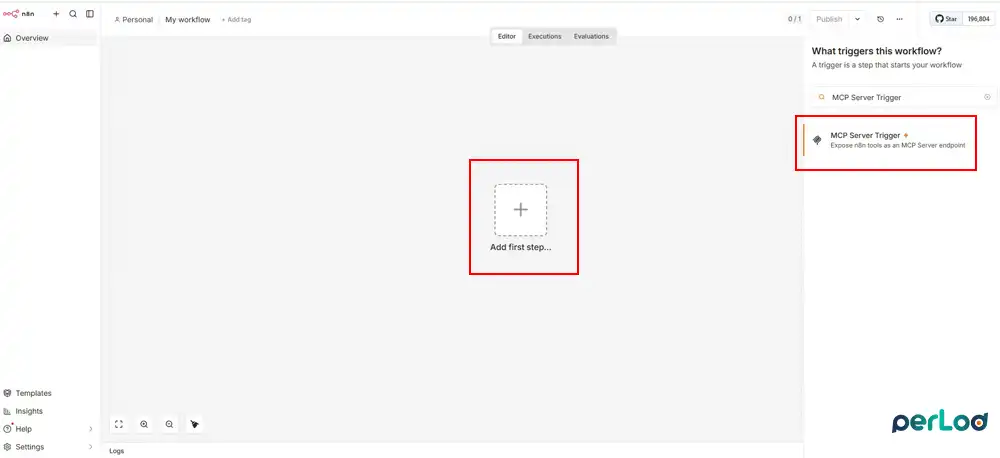
This node only executes attached tool nodes; it does nothing on its own, so don’t expect any data flow until tools are connected.
Step 3. Set the Path and Review the URLs
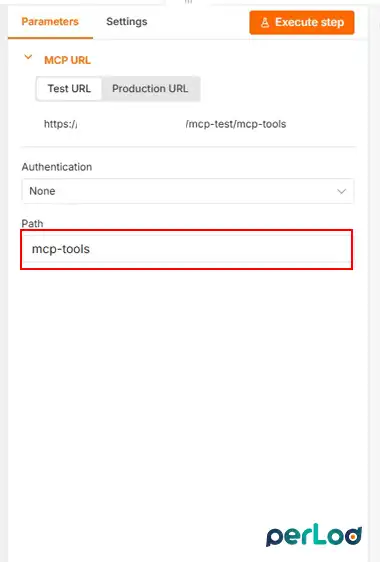
Open the MCP Server Trigger node’s panel and note the two URL modes at the top: Test URL and Production URL. Replace the auto-generated UUID in the Path field with something memorable, such as mcp-tools, so your endpoint stays predictable across environments.
- Test URL activates when you click Execute step or Execute workflow, and shows results directly on the canvas.
- Production URL activates only after you Publish the workflow, and logs calls under the Executions tab instead of the canvas.
Step 4. Configure Authentication
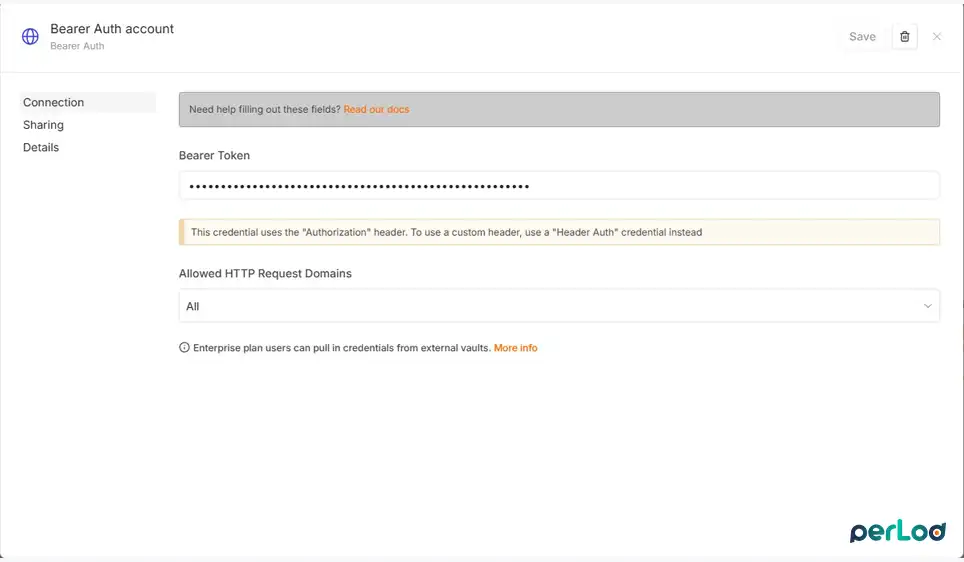
In the same panel, open the Authentication dropdown, which defaults to “None,” which is unsafe for anything public, and select Bearer Auth or others. Click to create a new credential, then generate a strong random token on your VPS:
openssl rand -hex 32Paste that value into the Bearer Token field, leave Allowed HTTP Request Domains as “All,” and click Save. Store the token in a password manager; you’ll need the exact value later for every MCP client configuration.
Step 5. Attach a Tool Node
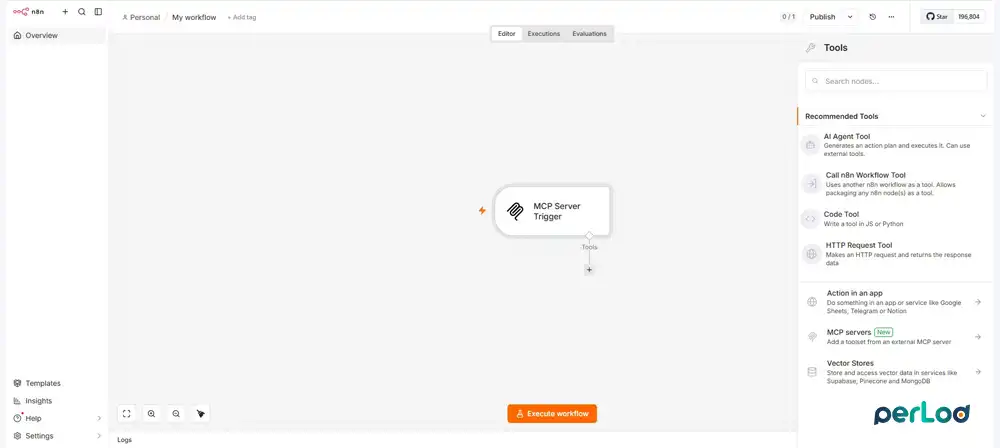
Click the + under the Tools connector beneath the trigger node. Search for “n8n” and select Call n8n Workflow Tool; this is the current name for the node that packages any existing workflow as a callable MCP tool.
Step 6. Configure the Tool Node
Fill in the panel fields carefully, since the AI client relies entirely on this metadata to decide when and how to call the tool:
- Description: a precise sentence stating exactly what the tool does and what input it expects. For example, “Call this tool to send a Slack message. The input should be a channel name and a message string.”
- Source: leave as “Database” to select an existing saved workflow.
- Workflow: click Choose… and select the specific workflow this tool should trigger.
The workflow you’re calling must begin with an Execute Workflow Trigger node; it shows up as “When Executed by Another Workflow” inside that workflow. If it starts with a Manual Trigger or Webhook instead, the tool call will fail with a “Missing node to start execution” error.
Step 7. Build and Activate the Target Sub-Workflow
If the workflow you want to expose doesn’t have the right trigger yet:
- Open or create that workflow separately from your MCP Server workflow.
- Add an Execute Workflow Trigger node as the very first step.
- Set its Input data mode to “Define input structure” and list the exact fields the tool should accept; avoid “Accept all data,” since the AI agent needs explicit fields to know what to send.
- Build out the actual logic/actions after the trigger.
- Make sure the last node returns the data you want the AI to see as the tool’s response.
- Publish this sub-workflow too; an unpublished sub-workflow cannot be called by another workflow’s tool node, even if it runs fine manually.
Step 8. Test and Publish the MCP Server Workflow
Back in your MCP Server workflow, click Execute step on the trigger node to activate test mode, then call the Test URL to confirm the tool is listed and returns correct output. Once verified, click Publish in the top-right corner.
Note that in current n8n versions, there’s no separate “Active” toggle anymore; Publish is the equivalent action that registers your Production URL and starts routing real client calls to the Executions tab.
Step 9. Connect an MCP Client
For example, for Claude Desktop, add this to its configuration file, replacing the placeholders with your actual URL and token from your n8n MCP Server Trigger setup:
{
  "mcpServers": {
    "n8n": {
      "command": "npx",
      "args": [
        "mcp-remote",
        "<MCP_URL>",
        "--header",
        "Authorization: Bearer ${AUTH_TOKEN}"
      ],
      "env": {
        "AUTH_TOKEN": "<MCP_BEARER_TOKEN>"
      }
    }
  }
}
Restart Claude Desktop, and it should list your exposed n8n tools automatically. You can also connect an n8n MCP Client Tool node from another workflow to call the same server, which is useful for testing your n8n MCP Server Trigger setup entirely within n8n itself.
Step 10. Test the Connection
Run a few checks to confirm your n8n MCP Server Trigger setup works correctly:
- Call the test MCP URL and confirm the workflow execution appears in the canvas.
- Ask the connected AI client to list available tools and verify names/descriptions match what you configured.
- Trigger one tool with a valid input and confirm the expected output.
- Trigger one tool with invalid input and confirm your error handling responds cleanly.
- Check the Executions tab for production calls to confirm logging works.
If SSE connections drop or hang, revisit the Nginx buffering settings; this is the most common failure point in an n8n MCP Server Trigger setup behind a reverse proxy.
Conclusion
A well n8n MCP Server Trigger setup gives AI agents access only to the specific tools you choose, not your whole n8n instance. With HTTPS, authentication, clear tool descriptions, and solid error handling in place, you get a safe, controlled connection between n8n and any MCP client, one workflow at a time.
We hope you enjoy this guide. For more detailed information, check the official n8n MCP Server Trigger docs.
FAQs
What is the MCP Server Trigger node used for?
It turns an n8n workflow into an MCP server, exposing only attached tool nodes to MCP clients.
Does the MCP Server Trigger support stdio transport?
No, it supports SSE and streamable HTTP only; use a bridge like mcp-remote for stdio-based clients.
Can I run MCP behind multiple webhook replicas?
Only if you route all /mcp* traffic to one dedicated replica, since SSE requires a persistent connection to a single instance.

