How to Deploy Cilium and Hubble for eBPF Network Policies on a Self-Hosted Kubernetes Cluster
Running a self-hosted Kubernetes cluster gives you full control over the network stack, and that control is wasted if you are still relying on basic iptables-based CNI plugins. This guide teaches you a complete Cilium Hubble Kubernetes network policy deployment on a self-hosted K3s cluster, from replacing the default CNI to building L7 HTTP policies from real observed traffic instead of guesswork.
Table of Contents
Why eBPF Changes the Network Policy Game
Standard Kubernetes NetworkPolicy rules are enforced by your CNI plugin, and most use iptables chains, which slow down and get messy as rules grow. Cilium replaces that with eBPF programs running directly in the kernel, so policy decisions happen much faster, without the long iptables lookups.
Hubble builds on that same eBPF layer to give you visibility. It captures every packet, DNS query, and HTTP request as a flow, which is the base of a solid Cilium Hubble Kubernetes network policy setup.
You watch real traffic first, then write rules based on what you actually saw, instead of guessing and hoping nothing breaks.
Prerequisites
Getting these requirements right will save you debugging headaches later. Before starting Cilium Hubble Kubernetes network policy setup, make sure you have:
- A self-hosted Kubernetes cluster. This guide uses K3s on Ubuntu 24.04; see the K3s single-node install guide if you need to build one.
- Root or sudo access on every node, with kernel version 4.19 or newer, so all eBPF features are available.
kubectlconfigured with the cluster. Helm v3 is required for enabling Hubble and audit mode.- Outbound internet access from the nodes to pull container images and Helm charts.
- At least one extra worker node besides the control plane, so you can properly test traffic between nodes and multi-service policies.
Step 1. Set up K3s Without the Default CNI
Cilium needs full control over pod networking, so K3s must be installed with Flannel and its built-in network policy controller turned off. On a fresh node, run:
curl -sfL https://get.k3s.io | INSTALL_K3S_EXEC="server \
  --flannel-backend=none \
  --disable-network-policy \
  --disable-kube-proxy \
--disable=traefik" sh ---flannel-backend=nonestops K3s from installing its default CNI.--disable-network-policyturns off K3s’s built-in policy enforcer so it does not conflict with Cilium.--disable-kube-proxyremoves kube-proxy because Cilium will replace it with its own eBPF-based service load balancer.
Disabling Traefik is optional but keeps the cluster clean if you plan to expose services through Cilium’s own ingress or gateway features later.
Note: If you already have a running K3s cluster with Flannel, you can edit the systemd unit instead of reinstalling:
sudo sed -i 's|ExecStart=/usr/local/bin/k3s server|& --flannel-backend=none --disable-kube-proxy --disable-network-policy|' /etc/systemd/system/k3s.service
sudo systemctl daemon-reload
sudo systemctl restart k3s
sudo rm -f /var/lib/rancher/k3s/agent/etc/cni/net.d/*
Join any additional worker nodes using the node token stored at /var/lib/rancher/k3s/server/node-token on the server:
curl -sfL https://get.k3s.io | K3S_URL="https://<MASTER_IP>:6443" K3S_TOKEN="<NODE_TOKEN>" sh -Export the kubeconfig so kubectl, helm, and the Cilium CLI can all reach the cluster:
export KUBECONFIG=/etc/rancher/k3s/k3s.yaml
kubectl get nodes
This basic K3s setup is the starting point for the whole Cilium Hubble Kubernetes network policy pipeline. Nodes will show Ready even though there’s no CNI yet. That’s normal, since K3s marks nodes ready before pod networking actually works, and it’ll stay that way until Cilium is installed.
Step 2. Install the Cilium CLI
The Cilium CLI handles installation, health checks, and feature toggles for the rest of this Cilium Hubble Kubernetes network policy setup, so install it before touching Helm:
CILIUM_CLI_VERSION=$(curl -s https://raw.githubusercontent.com/cilium/cilium-cli/main/stable.txt)
CLI_ARCH=amd64
if [ "$(uname -m)" = "aarch64" ]; then CLI_ARCH=arm64; fi
curl -L --fail --remote-name-all \
  https://github.com/cilium/cilium-cli/releases/download/${CILIUM_CLI_VERSION}/cilium-linux-${CLI_ARCH}.tar.gz{,.sha256sum}
sha256sum --check cilium-linux-${CLI_ARCH}.tar.gz.sha256sum
sudo tar xzvfC cilium-linux-${CLI_ARCH}.tar.gz /usr/local/bin
rm cilium-linux-${CLI_ARCH}.tar.gz{,.sha256sum}
cilium version --client
This pulls the latest stable release from Cilium’s official GitHub page and checks its checksum before installing, which is important on a public-facing server, where you never want to run unverified binaries in /usr/local/bin.
Install Helm
Steps 5 and 8 below use Helm to enable Hubble and toggle policy audit mode. On a minimal Ubuntu 24.04 server, running those commands without this step fails with:
Command 'helm' not found, but can be installed with: snap install helmInstall Helm directly instead of via snap, to keep it consistent with the rest of this guide:
curl -fsSL -o get_helm.sh https://raw.githubusercontent.com/helm/helm/main/scripts/get-helm-3
chmod +x get_helm.sh
./get_helm.sh
rm get_helm.sh
helm version
Add and refresh the Cilium Helm repository now so it is ready whenever a later step needs it:
helm repo add cilium https://helm.cilium.io/
helm repo update
Step 3. Install Cilium as the Cluster CNI
This is the step where your cluster actually gets eBPF-based networking. Everything else in this Cilium Hubble Kubernetes network policy guide builds on it.
With K3s using pod CIDR 10.42.0.0/16 by default, install Cilium and tell it to match that range:
cilium install --version 1.20.0 \
  --set kubeProxyReplacement=true \
  --set ipam.operator.clusterPoolIPv4PodCIDRList="10.42.0.0/16" \
--set operator.replicas=1kubeProxyReplacement=trueactivates Cilium’s eBPF service load balancer instead of relying on the kube-proxy we disabled in Step 1.operator.replicas=1is fine for a single control-plane server; set it to 2 if you have multiple control-plane nodes.
Watch the rollout and wait for a clean status:
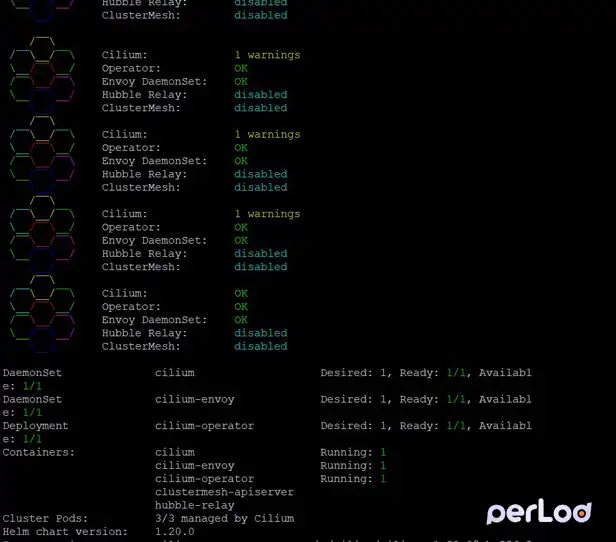
cilium status --waitA healthy result shows Cilium: OK, Operator: OK, Envoy DaemonSet: OK, and all pods as Ready. Seeing 1 warnings next to Cilium: OK during installation is usually normal. Hubble Relay: disabled and ClusterMesh: disabled are also expected because they are not enabled yet.
If any pods are stuck in Init or CrashLoopBackOff, check the troubleshooting section before moving on.
Step 4. Validate Cluster Connectivity
At this point, you must run a passing connectivity test before you build any Cilium Hubble Kubernetes network policy:
cilium connectivity testThis creates temporary test pods across different namespaces and nodes, verifies network connectivity, and shows which tests pass or fail. Do not skip it; fixing networking problems now is much easier than debugging policies later.
Step 5. Enable Hubble Relay and the Hubble UI
Hubble ships disabled by default when you use cilium install. Enable it, along with Relay and the web UI:
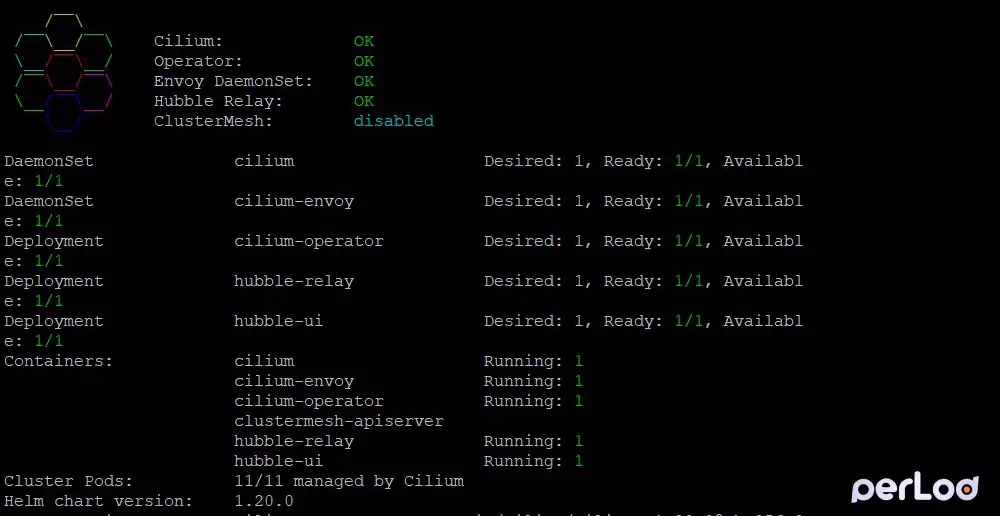
cilium hubble enable --uiThis command updates Cilium, restarts its agents so they can collect flow data, creates TLS certificates for Relay, and deploys both hubble-relay and hubble-ui.
Confirm everything came up:
cilium status --waitYou should now see Hubble Relay: OK alongside the Cilium and Operator lines. ClusterMesh is disabled because we use a single-cluster setup.
If you installed Cilium via Helm directly instead of the CLI, the equivalent upgrade is:
helm upgrade cilium cilium/cilium --version 1.20.0 \
  --namespace kube-system \
  --reuse-values \
  --set hubble.relay.enabled=true \
  --set hubble.ui.enabled=true
When you change Cilium settings with Helm, restart both the Cilium agents and Hubble Relay so the new settings apply correctly. Otherwise, Relay may not be able to connect to the agents:
kubectl -n kube-system rollout restart daemonset/cilium
kubectl -n kube-system rollout status daemonset/cilium
kubectl -n kube-system rollout restart deployment/hubble-relay
kubectl -n kube-system rollout status deployment/hubble-relay
Step 6. Install the Hubble CLI and Observe Live Flows
The Hubble CLI connects to Relay and lets you query flow data directly from your terminal, the fastest way to understand traffic before writing any Cilium Hubble Kubernetes network policy rules.
Install the version that matches your Cilium/Relay chart version rather than blindly pulling stable.txt, since a mismatched CLI produces a harmless but noisy Hubble CLI version is lower than Hubble Relay warning on every command:
HUBBLE_VERSION=v1.20.0
HUBBLE_ARCH=amd64
if [ "$(uname -m)" = "aarch64" ]; then HUBBLE_ARCH=arm64; fi
curl -L --fail --remote-name-all \
  https://github.com/cilium/hubble/releases/download/${HUBBLE_VERSION}/hubble-linux-${HUBBLE_ARCH}.tar.gz{,.sha256sum}
sha256sum --check hubble-linux-${HUBBLE_ARCH}.tar.gz.sha256sum
sudo tar xzvfC hubble-linux-${HUBBLE_ARCH}.tar.gz /usr/local/bin
rm hubble-linux-${HUBBLE_ARCH}.tar.gz{,.sha256sum}
hubble version
If the exact Hubble CLI version is not available, install the latest stable version instead. You may see a version warning, but it will still work.
Before running the port-forward, make sure an old port-forward process is not already using port 4245. This is the usual cause of the unable to listen on any of the requested ports: [{4245 4245}] error:
pkill -f "cilium hubble port-forward" 2>/dev/null
cilium hubble port-forward &
hubble status
In the output, you must see:
ℹ️  Hubble Relay is available at 127.0.0.1:4245
Healthcheck (via localhost:4245): Ok
If hubble status returns connection refused on port 4245, the hubble-relay pod itself may not be ready; check it before retrying:
kubectl -n kube-system get pods -l k8s-app=hubble-relay
kubectl -n kube-system logs -l k8s-app=hubble-relay --tail=30
Once hubble status is healthy, observe live traffic across the whole cluster:
hubble observe --followPress Ctrl+C to stop watching
You can use filters to view flows for a specific namespace or result, such as dropped traffic. This helps you see what is happening before enforcing a Cilium Hubble Kubernetes network policy in that namespace:
hubble observe --namespace demo --verdict DROPPED --follow
hubble observe --to-port 443 --protocol tcp
To view the same data visually, port-forward the UI and open it in a browser:
cilium hubble uiThis opens hubble-ui at http://localhost:12000, where you get a live service map showing which pods talk to which, over what protocol, and whether traffic was forwarded, dropped, or audited.
Step 7. Deploy a Demo Multi-Service Application
To test the policies, deploy a simple three-tier app, including a public frontend, an internal api, and a PostgreSQL database. We also add a separate reporting pod to confirm that unwanted traffic is blocked:
kubectl create namespace demo

cat <<'EOF' | kubectl apply -n demo -f -
apiVersion: apps/v1
kind: Deployment
metadata:
  name: frontend
spec:
  replicas: 2
  selector:
    matchLabels:
      app: frontend
  template:
    metadata:
      labels:
        app: frontend
    spec:
      containers:
        - name: frontend
          image: nginxdemos/hello
          ports:
            - containerPort: 80
---
apiVersion: v1
kind: Service
metadata:
  name: frontend
spec:
  selector:
    app: frontend
  ports:
    - port: 80
---
apiVersion: apps/v1
kind: Deployment
metadata:
  name: api
spec:
  replicas: 2
  selector:
    matchLabels:
      app: api
  template:
    metadata:
      labels:
        app: api
    spec:
      containers:
        - name: api
          image: hashicorp/http-echo
          args: ["-text=api-ok", "-listen=:8080"]
          ports:
            - containerPort: 8080
---
apiVersion: v1
kind: Service
metadata:
  name: api
spec:
  selector:
    app: api
  ports:
    - port: 8080
---
apiVersion: apps/v1
kind: Deployment
metadata:
  name: database
spec:
  replicas: 1
  selector:
    matchLabels:
      app: database
  template:
    metadata:
      labels:
        app: database
    spec:
      containers:
        - name: database
          image: postgres:16-alpine
          env:
            - name: POSTGRES_PASSWORD
              value: demo-password
          ports:
            - containerPort: 5432
---
apiVersion: v1
kind: Service
metadata:
  name: database
spec:
  selector:
    app: database
  ports:
    - port: 5432
---
apiVersion: apps/v1
kind: Deployment
metadata:
  name: reporting
spec:
  replicas: 1
  selector:
    matchLabels:
      app: reporting
  template:
    metadata:
      labels:
        app: reporting
    spec:
      containers:
        - name: reporting
          image: curlimages/curl
          command: ["sleep", "infinity"]
EOF
Right now, every pod can talk to every other pod because no policies are active yet. Check this with Hubble before applying any restrictions.
If hubble observe --namespace demo --follow shows nothing, first make sure the pods exist:
kubectl get pods -n demoThen create some traffic from a second terminal so Hubble has flows to display:
kubectl exec -n demo deploy/frontend -- curl -s http://api:8080
hubble observe --namespace demo --follow
Step 8. Build Policy from Traffic Using Audit Mode
Instead of guessing which traffic to allow, you can use audit mode. Cilium will log traffic that it would block, but it will not actually block it. This lets you use Hubble to see real traffic before enforcing a Cilium Hubble Kubernetes network policy.
Turn on audit mode for the whole cluster temporarily with Helm. Then restart the Cilium agents and Hubble Relay so the setting applies. If you skip the Relay restart, hubble observe may show this error:
dial tcp 127.0.0.1:4244: connect: connection refusedhelm upgrade cilium cilium/cilium --version 1.20.0 \
--namespace kube-system \
--reuse-values \
--set policyAuditMode=true
kubectl -n kube-system rollout restart daemonset/cilium
kubectl -n kube-system rollout status daemonset/cilium
kubectl -n kube-system rollout restart deployment/hubble-relay
kubectl -n kube-system rollout status deployment/hubble-relay
cilium status --waitWith audit mode enabled, apply a test default-deny policy to the api and database pods. Then create normal traffic and use Hubble to see what Cilium would block:
hubble observe --namespace demo --verdict AUDIT --followEach AUDIT flow shows the source, destination, port, and protocol that your final policy must allow. For a small app, watch normal traffic for a few minutes. Then turn audit mode off before enforcing policies, and restart both components again:
helm upgrade cilium cilium/cilium --version 1.20.0 \
  --namespace kube-system \
  --reuse-values \
  --set policyAuditMode=false
kubectl -n kube-system rollout restart daemonset/cilium
kubectl -n kube-system rollout status daemonset/cilium
kubectl -n kube-system rollout restart deployment/hubble-relay
kubectl -n kube-system rollout status deployment/hubble-relay
You can enable audit mode for one endpoint with:
cilium-dbg endpoint config <ID> PolicyAuditMode=EnabledHowever, it may return a 400 error even when the endpoint is healthy. This does not mean your cluster is broken. The cluster-wide Helm audit mode is more reliable, so use that instead.
Step 9. Apply a Default-Deny Baseline
A default-deny policy is the base for every other Cilium Hubble Kubernetes network policy rule in this guide.
After you understand your app’s traffic, apply default-deny to lock down the namespace. Once active, pods cannot send or receive traffic unless another policy allows it.
apiVersion: "cilium.io/v2"
kind: CiliumNetworkPolicy
metadata:
  name: default-deny
  namespace: demo
spec:
  endpointSelector: {}
  ingress:
  - {}
  egress:
  - {}
kubectl apply -f default-deny.yamlendpointSelector: {} selects every pod in the demo namespace. The empty ingress and egress rules allow nothing, so all traffic is blocked by default.
This creates the zero-trust base for the rest of the Cilium Hubble Kubernetes network policy rules. Confirm it works by watching allowed traffic get blocked:
hubble observe --namespace demo --verdict DROPPED --followStep 10. Allow DNS Resolution
Almost every pod needs DNS before it needs anything else, so allow egress to CoreDNS before adding service-specific rules:
apiVersion: "cilium.io/v2"
kind: CiliumNetworkPolicy
metadata:
  name: allow-dns
  namespace: demo
spec:
  endpointSelector: {}
  egress:
    - toEndpoints:
        - matchLabels:
            "k8s:io.kubernetes.pod.namespace": kube-system
            "k8s:k8s-app": kube-dns
      toPorts:
        - ports:
            - port: "53"
              protocol: ANY
          rules:
            dns:
              - matchPattern: "*"
kubectl apply -f allow-dns.yamlmatchPattern: "*" allows DNS queries for any domain. This is usually safe because DNS only resolves names; actual network traffic is still controlled by separate FQDN or IP rules.
If a pod needs to access an external API by hostname, add a toFQDNs rule next.
Step 11. Restrict External Egress with toFQDNs
To let the reporting pod access one external hostname without allowing full internet access, use a DNS rule with toFQDNs. It only allows traffic to the IP addresses resolved for that hostname:
apiVersion: "cilium.io/v2"
kind: CiliumNetworkPolicy
metadata:
  name: reporting-external-egress
  namespace: demo
spec:
  endpointSelector:
    matchLabels:
      app: reporting
  egress:
    - toEndpoints:
        - matchLabels:
            "k8s:io.kubernetes.pod.namespace": kube-system
            "k8s:k8s-app": kube-dns
      toPorts:
        - ports:
            - port: "53"
              protocol: ANY
          rules:
            dns:
              - matchPattern: "api.example.com"
    - toFQDNs:
        - matchName: "api.example.com"
      toPorts:
        - ports:
            - port: "443"
              protocol: TCP
kubectl apply -f reporting-fqdn-egress.yamlCilium watches the DNS lookup for api.example.com, saves its IP addresses, and only allows TCP traffic to those IPs on port 443.
All other outbound traffic stays blocked by the default-deny policy. Unlike a fixed CIDR allow list, this rule keeps working when the service’s IP addresses change.
Step 12. Allow Ingress Between Tiers
Now allow only the connections your app needs. These L3/L4 ingress rules let frontend connect to api, and api connect to database, using their required ports:
apiVersion: "cilium.io/v2"
kind: CiliumNetworkPolicy
metadata:
  name: allow-frontend-to-api
  namespace: demo
spec:
  endpointSelector:
    matchLabels:
      app: api
  ingress:
    - fromEndpoints:
        - matchLabels:
            app: frontend
      toPorts:
        - ports:
            - port: "8080"
              protocol: TCP
---
apiVersion: "cilium.io/v2"
kind: CiliumNetworkPolicy
metadata:
  name: allow-api-to-database
  namespace: demo
spec:
  endpointSelector:
    matchLabels:
      app: database
  ingress:
    - fromEndpoints:
        - matchLabels:
            app: api
      toPorts:
        - ports:
            - port: "5432"
              protocol: TCP
kubectl apply -f allow-frontend-to-api.yaml
kubectl apply -f allow-api-to-database.yamlNotice that reporting is not listed as an allowed source anywhere, so it stays fully isolated from api and database even though it lives in the same namespace.
Verify with a quick test from inside the reporting pod:
kubectl exec -n demo deploy/reporting -- curl -m 3 -s -o /dev/null -w "%{http_code}\n" http://api:8080This command should time out or fail, confirming the isolation is enforced, and you can watch the corresponding DROPPED verdict live in hubble observe.
Step 13. Enforce a Cilium Hubble Kubernetes Network Policy for L7 HTTP
L3/L4 rules only control IP addresses and ports. Cilium’s L7 proxy can also check HTTP methods and paths.
This policy lets frontend call only GET /public and GET /health on the api service. All other HTTP methods and paths are blocked, even if the TCP connection is allowed:
apiVersion: "cilium.io/v2"
kind: CiliumNetworkPolicy
metadata:
  name: api-l7-http
  namespace: demo
spec:
  endpointSelector:
    matchLabels:
      app: api
  ingress:
    - fromEndpoints:
        - matchLabels:
            app: frontend
      toPorts:
        - ports:
            - port: "8080"
              protocol: TCP
          rules:
            http:
              - method: "GET"
                path: "/public"
              - method: "GET"
                path: "/health"
kubectl apply -f api-l7-http.yamlAfter you apply the policy, Cilium uses an Envoy L7 proxy for the api service. Requests to /public and /health are allowed, but POST /admin from the same frontend pod returns HTTP 403.
This gives you HTTP-level control, while standard Kubernetes NetworkPolicy rules only control traffic up to L4 (IP addresses and ports).
Test it directly:
kubectl exec -n demo deploy/frontend -- curl -s -o /dev/null -w "%{http_code}\n" http://api:8080/public
kubectl exec -n demo deploy/frontend -- curl -s -o /dev/null -w "%{http_code}\n" http://api:8080/admin
The first call should return 200, and the second should be rejected by the L7 proxy rather than the connection itself failing.
Step 14. Inspect Flows and Confirm Enforcement
With all policies applied, use Hubble again to check that everything works as expected. This completes the Cilium Hubble Kubernetes network policy workflow: observe traffic first, then enforce the rules.
hubble observe --namespace demo --followLook for FORWARDED traffic that you allowed and DROPPED traffic from reporting to api. You will only see AUDIT flows when audit mode is enabled.
In Hubble UI, allowed connections are solid lines and blocked ones show as red drops.
Troubleshooting Cilium Traffic Drops
Most policy issues are easy to identify with Hubble flow data.
1. Allowed traffic is dropped:
run:
hubble observe --verdict DROPPED -o jsonCheck drop_reason_desc. POLICY_DENIED usually means your policy labels do not match the pod labels. Check them with:
kubectl get pod <name> -n demo --show-labels2. helm: command not found:
Install Helm using Step 2, then add the Cilium repository:
helm repo add cilium https://helm.cilium.io/3. Port 4245 is already in use:
Stop the old port-forward process, then start it again:
pkill -f "cilium hubble port-forward"
cilium hubble port-forward &
4. Hubble CLI version warning: This is only a warning. Install a Hubble CLI version that matches your Cilium version to remove it.
5. Relay cannot connect to port 4244:
Restart Cilium and Hubble Relay after Helm changes:
kubectl -n kube-system rollout restart daemonset/cilium
kubectl -n kube-system rollout restart deployment/hubble-relay
6. hubble observe cannot connect to port 4245:
Your local port-forward is not running. Start it again, then check:
cilium hubble port-forward &
hubble status
7. Per-endpoint audit mode returns a 400 error: Use cluster-wide audit mode with Helm instead. It is more reliable.
8. DNS fails after default-deny: Make sure the DNS policy matches both the kube-system namespace and the k8s-app: kube-dns label.
9. L7 HTTP policy does not work:
Check that the Envoy DaemonSet is running:
kubectl -n kube-system get pods -l k8s-app=cilium-envoy10. Everything is blocked after default-deny: This is normal until you add allow rules. Use audit mode first to see which traffic your app needs.
Conclusion
Your self-hosted Kubernetes cluster now uses Cilium for networking and Hubble for live traffic visibility. You have policies for default-deny, DNS, external access, service-to-service traffic, and L7 HTTP rules.
The key process is simple: use Hubble to watch real traffic, test rules in audit mode, then enforce them. This helps prevent a Cilium Hubble Kubernetes network policy from breaking your application in production.
Deploy the Kubernetes control plane and Cilium-enabled workloads on PerLod dedicated servers for full network and kernel control, which matters once you start running kube-proxy replacement and L7 proxying in production rather than a lab.
For extra protection beyond Kubernetes, read our guide on Linux server microsegmentation.
FAQs
Does Cilium fully replace kube-proxy?
Yes. With kubeProxyReplacement=true, Cilium handles service load balancing with eBPF, so you do not need kube-proxy.
Can I run Cilium alongside an existing CNI?
No, Cilium needs to be the only CNI managing pod networking. You must disable the previous CNI before installing Cilium.
Does Hubble store historical flow data by default?
No. Hubble only keeps recent flows in memory. For long-term storage, export flows to a SIEM or Prometheus/Grafana.

