How to Self-Host NetBox with Docker for IPAM, DCIM, and Infrastructure Source of Truth
If you manage VPS instances, dedicated servers, or MikroTik-based network instances, spreadsheets stop scaling fast. This guide shows you how to self-host NetBox Docker IPAM, from setting up containers to modeling your entire infrastructure as queryable data and automating it through the REST API.
This guide treats NetBox as the single source of truth for your IP address space, racks, devices, and MikroTik routers, and ends with a working automation and backup workflow you can run in production.
Table of Contents
Why Self-Host NetBox Docker IPAM Instead of Spreadsheets
Spreadsheets and static documents break down quickly once you’re tracking more than a few VPS instances, dedicated servers, or MikroTik routers across data centers. When you self-host NetBox Docker IPAM, you get a relational data model purpose-built for networking, such as sites, racks, devices, interfaces, VLANs, prefixes, IP addresses, and tenants, all live as connected, validated records instead of loose cells in a sheet.
Hosting NetBox yourself means your sensitive inventory data, including IP allocations, credentials references, and rack diagrams, stays on your own server instead of sitting in a third-party SaaS database.
If you’re already running MikroTik routers with BGP across your VPS or dedicated-server setup, this matters even more. Every prefix, VLAN, and interface you configure on a router can be copied straight into NetBox, so your documentation always matches what’s actually running.
Prerequisites Before You Deploy NetBox
Before you self-host NetBox Docker IPAM, prepare the following:
- A Linux VPS or dedicated server with at least 2 vCPUs and 4 GB RAM. 8 GB recommended for larger inventories. A flexible Linux VPS is a good starting point.
- Docker Engine, Docker Compose, and Git are installed.
- A domain name or subdomain is pointed to your server’s public IP.
- Root or sudo access to open ports 80 and 443.
We assumed you have a running VPS with Ubuntu 24.04. Check that the required tools are installed:
docker --version
docker compose version
git --version
Step 1. Clone the Official NetBox Docker Project
The recommended way to self-host NetBox Docker IPAM is via the official NetBox Docker project, which provides a production-ready Compose stack that includes PostgreSQL, Redis, and the NetBox application containers.
sudo mkdir -p /opt/netbox && cd /opt/netbox
git clone -b release https://github.com/netbox-community/netbox-docker.git
cd netbox-dockerNote: Cloning the release branch ensures you always track the latest stable NetBox Docker build rather than in-development snapshots.
Step 2. Configure the NetBox Docker Compose Override File
By default, the base docker-compose.yml keeps NetBox locked inside the container network so it can’t be reached from outside. To expose it and set your core settings, you can use a separate override file, which Docker Compose automatically merges in when it starts up.
Copy the file:
cp docker-compose.override.yml.example docker-compose.override.ymlOpen the Docker Compose override file to expose NetBox on port 8000 and set up your admin account:
nano docker-compose.override.ymlUncomment and configure the following values:
services:
  netbox:
    ports:
      - "8000:8080"
    environment:
      SKIP_SUPERUSER: "false"
      SUPERUSER_NAME: "admin"
      SUPERUSER_EMAIL: "ad***@********in.com"
      SUPERUSER_PASSWORD: "change-this-strong-password"
      SUPERUSER_API_TOKEN: ""
This is the best way to self-host NetBox Docker IPAM without editing the tracked docker-compose.yml file directly.
Step 3. Pull Images and Start PostgreSQL, Redis, and NetBox
This three-container setup is what you’ll run whenever you self-host NetBox Docker IPAM on a single VPS, and it holds up fine even with tens of thousands of records before you’d ever need to spread things across multiple servers.
Every NetBox Docker stack has three core pieces:
- PostgreSQL to store the data.
- Redis to handle caching and background tasks.
- NetBox application split into a web container and a worker container.
Pull the images and bring up the stack:
docker compose pull
docker compose up -d
Watch the containers come up healthy:
docker compose ps
docker compose logs -f netbox
The first boot runs database migrations automatically, so give it a few minutes on a fresh volume before the health check reports “healthy“.
Once ready, open the following URL in a browser:
http://<your-server-ip>:8000/You should see the NetBox login page.
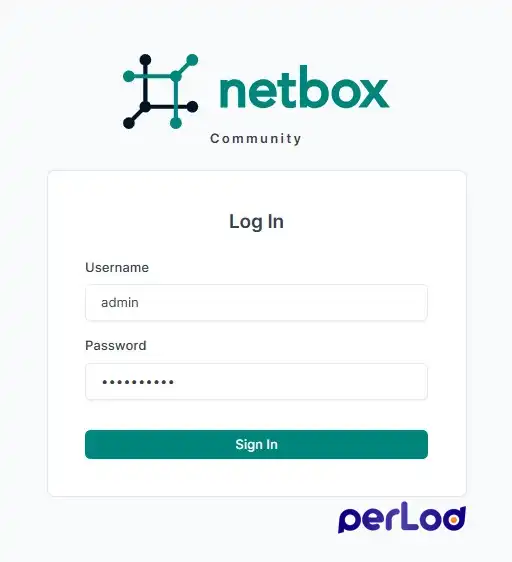
Note: If you did not set up a superuser via environment variables in Step 2, you can create one manually:
docker compose exec netbox /opt/netbox/netbox/manage.py createsuperuserFollow the prompts for a username, email, and password, then log in at the URL above with those credentials.
Step 4. Secure NetBox with HTTPS Using Caddy
Once you self-host NetBox Docker IPAM in production, plain HTTP isn’t safe because it sends your login credentials and infrastructure data in plain text that anyone on the network could read. The official docs recommend adding a lightweight Caddy container in front of NetBox to handle HTTPS automatically.
Create a Caddyfile in the project root:
cd /opt/netbox/netbox-docker
nano Caddyfile
Paste this with your domain:
netbox.yourdomain.com {
    reverse_proxy netbox:8080
    encode gzip zstd
}
Then, open the docker-compose.override.yml:
nano docker-compose.override.ymlAdd the Caddy service:
services:
  netbox:
    expose:
      - "8080"
  tls:
    image: caddy:2-alpine
    depends_on:
      - netbox
    volumes:
      - ./Caddyfile:/etc/caddy/Caddyfile:ro
      - caddy-data:/data
    ports:
      - "80:80"
      - "443:443"

volumes:
  caddy-data:
Restart the stack:
docker compose up -dCaddy will automatically request and renew a Let’s Encrypt certificate for your domain, and you can reach NetBox over HTTPS.
https://netbox.yourdomain.comStep 5. Configure RBAC and User Permissions
A source-of-truth platform is only trustworthy if access is controlled. When you self-host NetBox Docker IPAM for a team, use NetBox’s built-in role-based access control instead of sharing one admin login.
From the NetBox dashboard, go to Admin > Authentication.
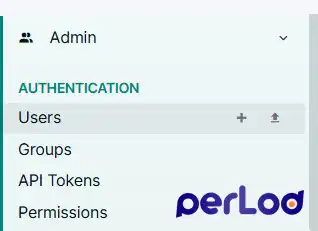
Add Users
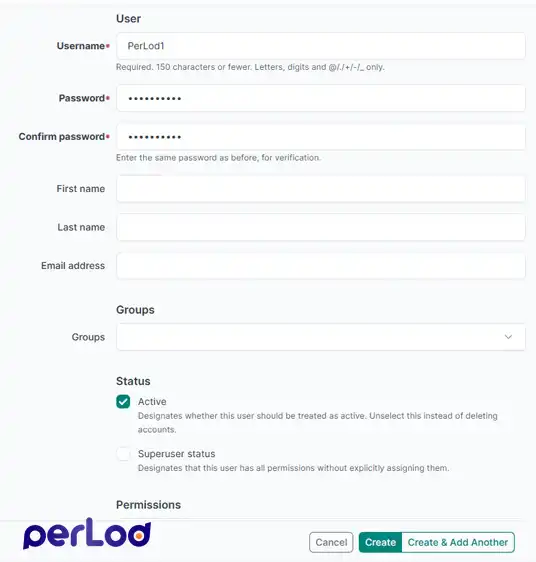
From the Users page, click +Add. Fill in details:
- Username.
- Password / Confirm password.
- First name / Last name / Email address: optional but recommended for real engineers.
- Groups: leave empty for now.
- Active: keep checked.
- Superuser status: leave unchecked. Only for full admins.
- Permissions: leave empty; permissions should come from the Group, not the individual user.
- Click Create.
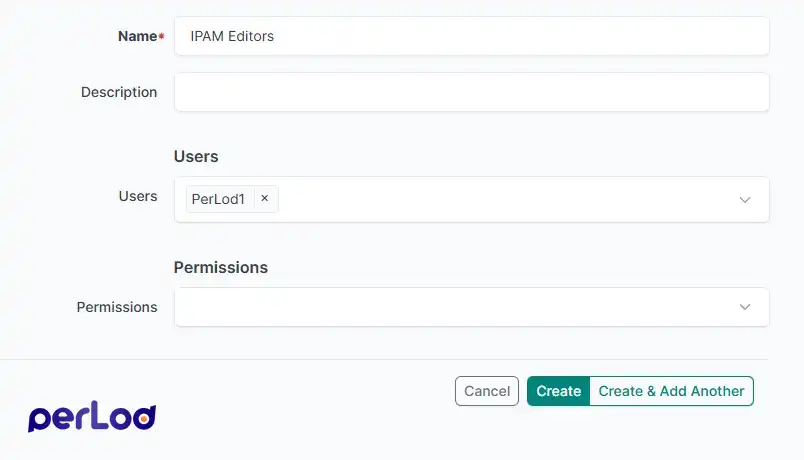
Add Group
From the Groups page, click +Add. Fill in details:
- Name: For example, IPAM Editors.
- Description: optional, for example, Can manage IP addresses and prefixes.
- Users: select the user you just created.
- Permissions: leave empty.
- Click Create.
Add Permission
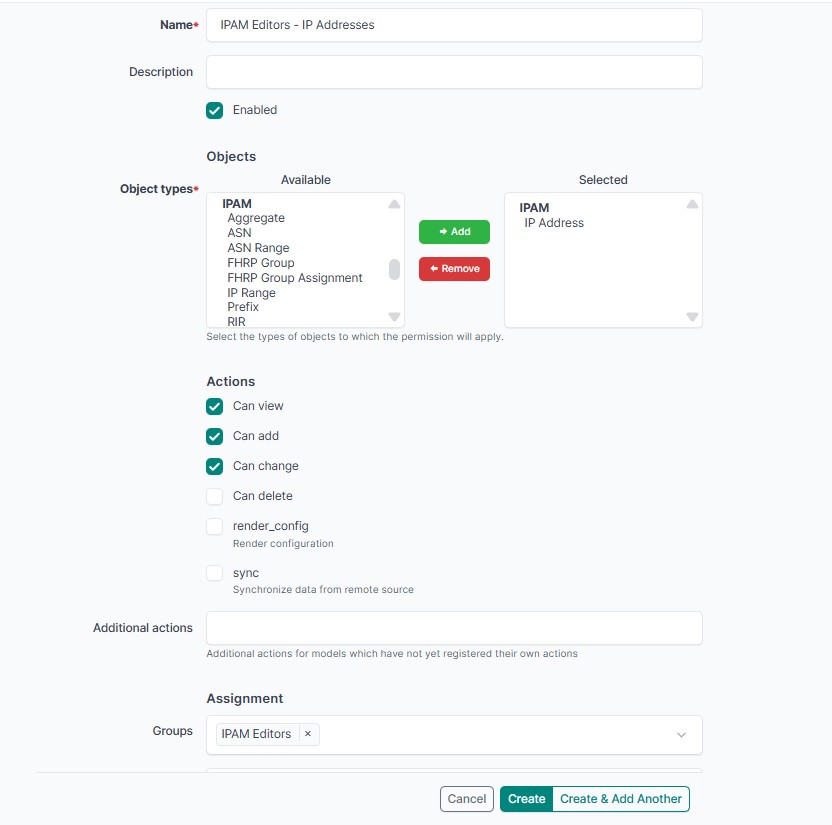
From the Permissions page, click +Add. Fill in details:
- Name: For example, IPAM Editors – IP Addresses.
- Enabled: Keep checked.
- Object types: In the Available list, click IP Address (under IPAM), then click Add to move it to Selected. Repeat for any other object type this group needs, for example, Prefix, VLAN.
- Actions: check the boxes this group is allowed to do; for editors, check Can view, Can add, Can change. Skip Can delete unless they should be able to remove records.
- Assignment → Groups: select IPAM Editors.
- Assignment → Users: leave empty.
- Constraints: leave blank unless you want to scope it further.
- Click Create.
Add API Token
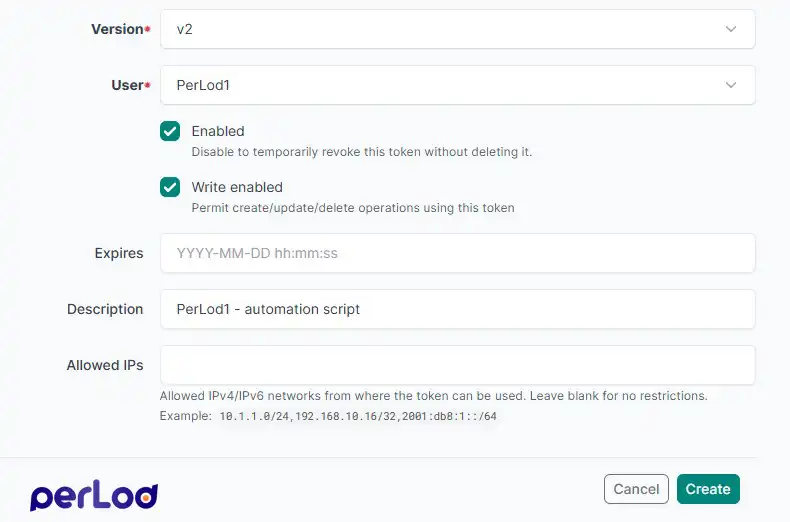
From the API Tokens page, click +Add. Fill in details:
- Version: keep v2.
- User: select the user this token belongs to.
- Enabled: keep checked.
- Write enabled: uncheck this if the user should only be able to read data via the API and leave it checked only if they need to create/update/delete through the API.
- Expires: optional; set a date if you want the token to auto-expire.
- Description: for example, PerLod1 – automation script.
- Allowed IPs: optional; restrict the token to a specific server/IP, so it can’t be used if leaked.
- Click Create.
This way, interns or junior staff can look through the inventory without any risk of accidentally deleting real prefixes or devices.
Step 6. Model Your Infrastructure: Sites, Racks, and Devices
Now that NetBox is running, it’s time to actually build your source of truth. This is the point where the tool stops being just installed and starts becoming useful if you’re managing VPS, dedicated servers, or MikroTik instances.
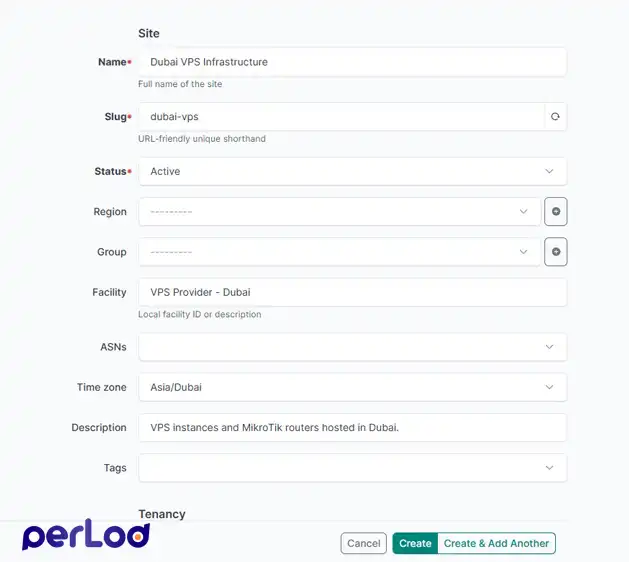
Create a Site
Sites are locations where your infrastructure runs. They can be real places, like a data center or colocation rack, or virtual locations, like a VPS provider in a specific region.
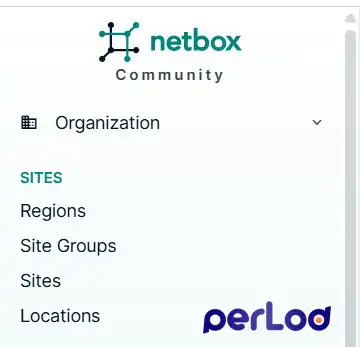
Click Organization in the left menu, click Sites, and click +Add.
For a VPS or dedicated-server setup, you can fill it like this:
| Field | Example value | Notes |
|---|---|---|
| Name | Dubai VPS Infrastructure | A clear name for the provider/location |
| Slug | dubai-vps | Short URL-friendly ID; lowercase with hyphens |
| Status | Active | Keep the default |
| Region | Middle East | Optional; create/select it if you use regions |
| Group | Leave blank | Optional |
| Facility | VPS Provider - Dubai | Optional provider or data center name |
| ASNs | Leave blank | Add only if this site owns/uses an ASN |
| Time zone | Asia/Dubai | Recommended |
| Description | VPS instances and MikroTik routers hosted in Dubai. | Optional but useful |
| Tenant group / Tenant | Leave blank | Use only for customers or separate projects |
| Physical address | Leave blank | Usually unknown/not needed for VPS hosting |
| Latitude / Longitude | Leave blank | Optional |
| Owner group / Owner | Leave blank | Optional |
| Comments | Primary VPS location for production services. | Optional |
| Changelog message | Created initial Dubai VPS site. | Recommended for audit history |
Then click Create.
Create a Rack
Racks belong to a Site and represent the real server cabinets in a data center. Use them when you have colocated or dedicated physical servers.
Click Rack and click +Add.
Fill the form like this:
| Field | Example value | Notes |
|---|---|---|
| Site | A required DC | Required. Select the Site you created earlier |
| Location | Leave blank | Optional; use it for a room, cage, or row |
| Rack Group | Leave blank | Optional; useful for groups such as Row A |
| Name | Rack A01 | Required. Use a clear, unique rack name |
| Status | Active | Keep the default |
| Role | Production | Optional; create/select roles such as Production, Network, or Lab |
| Rack Type | Leave blank | Optional; select it only if you already created a rack type |
| Description | Primary production rack for dedicated servers and network equipment. | Optional |
| Airflow | Front to rear | Use the physical airflow direction, if known |
| Tags | production | Optional |
| Field | Example value | Notes |
|---|---|---|
| Facility ID | FSN1-A01 | Optional ID assigned by the data-center provider |
| Serial number | Leave blank | Add it if you know the rack’s serial number |
| Asset tag | RACK-PROD-001 | Optional internal tracking label |
| Tenant group / Tenant | Leave blank | Use only if this rack belongs to a customer or project |
| Field | Example value | Notes |
|---|---|---|
| Form factor | 4-post cabinet | Select the closest match |
| Width | 19 inches | Standard server rack width |
| Starting unit | 1 | Keep the default |
| Height (U) | 42 | Common cabinet size; use 24, 42, 45, or your real value |
| Outer dimensions | Leave blank | Optional |
| Weight / Max weight | Leave blank | Optional |
| Mounting depth | 800 | Optional; in millimeters if known |
| Descending units | Leave unchecked | Check only if your rack units are numbered from top to bottom |
| Field | Example value | Notes |
|---|---|---|
| Owner group / Owner | Leave blank | Optional |
| Comments | Hosts production servers, MikroTik router, and top-of-rack switch. | Optional |
| Changelog message | Created production rack A01. | Recommended |
Click Create when finished.
Create Devices
Devices represent physical or virtual hardware, such as dedicated servers, MikroTik routers, switches, or firewalls.
From Devices, click +Add, define a Device Type and a Device Role, then create the device instance and assign it to a site and rack.
Remember that you must define a device role, then add the device.
Create Interfaces
Interfaces are the ports on a device, such as ether1, eth0, or wlan0. Add them from the device’s Interfaces tab. You will later assign IP addresses and VLANs to these interfaces.
Step 7: Model VLANs, Prefixes, and IP Addresses
This is the IPAM core of the platform, and the part that keeps you from self-host NetBox Docker IPAM as just another database; it enforces real network logic.
- VLANs (IPAM → VLANs): Add a VLAN ID, name, and the Site where it is used. For example, create VLAN 100 with the name Management for your MikroTik site.
- Prefixes (IPAM → Prefixes): Add the network ranges you use, such as
10.10.0.0/24or a public/29from your provider. Link each prefix to its Site and VLAN when needed. - IP Addresses (IPAM → IP Addresses): Add single IPs from a prefix and attach them to a device or VM interface. NetBox warns you if the same IP is assigned twice.
- VRFs and Aggregates: Use a VRF when different tenants use the same IP range. Use an Aggregate to track a larger block you own or receive from an upstream provider, such as a
/24.
If you use MikroTik routers with BGP, add every routed prefix and loopback IP to NetBox as soon as you configure it on the router. Make this a standard part of your deployment process, not something you do later.
If you still need to set up BGP, follow our BGP configuration on MikroTik VPS guide, then add the prefixes you create to NetBox.
Step 8: Add Tenants for Multi-Client or Multi-Project Separation
Tenant filters are often overlooked when teams self-host NetBox Docker IPAM, but they are very useful for MSPs that manage and bill infrastructure for multiple clients from one NetBox instance.
If you manage infrastructure for multiple clients, departments, or projects, use Organization > Tenancy > Tenants and Tenant Groups. Assign a tenant to sites, prefixes, devices, and IP addresses so you can filter the entire inventory by client.
It is essential when you self-host NetBox Docker IPAM as a shared platform for an agency, MSP, or multi-project team rather than a single owner.
Step 9: Automate with the REST API
Every object you create through the UI is also available through NetBox’s REST API, which is what turns a static inventory into an automation source.
Copy the token from your user profile API tokens. NetBox v4.5+ issues v2 tokens by default, which use a Bearer prefix rather than the deprecated v1 Token prefix.
Query all IP addresses as JSON:
curl -s -H "Authorization: Bearer <token-prefix>.<token-key>" \
  -H "Content-Type: application/json" \
  https://netbox.yourdomain.com/api/ipam/ip-addresses/ | jq
Create a new prefix via the API:
curl -s -X POST \
  -H "Authorization: Bearer <token-prefix>.<token-key>" \
  -H "Content-Type: application/json" \
  https://netbox.yourdomain.com/api/ipam/prefixes/ \
  -d '{"prefix": "10.20.0.0/24", "site": 1, "status": "active"}'
Export your full device inventory for a script or a spreadsheet handoff:
curl -s -H "Authorization: Bearer <token-prefix>.<token-key>" \
  "https://netbox.yourdomain.com/api/dcim/devices/?limit=0" | jq '.results' > devices.json
NetBox returns 50 results per API request by default. Use ?limit=0 to export everything, or ?fields= to return only the data you need. This keeps automation fast when you self-host NetBox Docker IPAM with a large inventory.
For Python automation, use the pynetbox library with Ansible, Terraform, or your own scripts.
NetBox Backup Strategy
Your NetBox database contains important network information, so back it up every day. If you lose it, you may lose your only accurate record of IPs, devices, and infrastructure. When you self-host NetBox Docker IPAM, run a nightly backup with cron:
cd /opt/netbox/netbox-docker
docker compose exec -T postgres sh -c 'pg_dump -cU $POSTGRES_USER $POSTGRES_DB' \
  | gzip > /opt/netbox-backups/netbox-$(date +%F).sql.gz
Also back up docker-compose.override.yml, Caddyfile, and any custom configuration.py files. These are not included in the database backup and are needed to rebuild NetBox.
Keep at least 7 daily backups and 4 weekly backups somewhere outside the NetBox server, such as another server with rsync or object storage.
Upgrade and Change-Control Process for NetBox
When you self-host NetBox Docker IPAM in production, keep it updated regularly. Skipping too many versions can make future upgrades harder and riskier.
Before every upgrade:
- Read the release notes for the version you plan to install.
- Create a fresh database backup.
- Pull the latest project files and Docker images:
cd /opt/netbox/netbox-docker
docker compose down
git checkout release && git pull -p origin release
docker compose pull
docker compose up -d- When NetBox starts after an upgrade, it updates its database schema automatically. Watch the logs until the container becomes healthy:
docker compose logs -f netbox- If you upgrade to a new major PostgreSQL version, back up the database first, then restore it into a new volume. Do not upgrade the old database volume in place.
For safer changes, use a pull request or ticket for bulk API updates. NetBox also records who changed each object and when. Add a changelog_message to API requests so automated changes are easy to track.
Conclusion
You now have a working setup to self-host NetBox Docker IPAM with PostgreSQL, Redis, HTTPS through Caddy, user permissions, and an inventory for sites, racks, devices, VLANs, prefixes, and IP addresses. You can also use the REST API for automation.
Keep regular backups and follow a safe upgrade process. Most importantly, update NetBox whenever you add, remove, or change an IP address, device, VLAN, or other real infrastructure.
We hope you enjoy this guide.
For more detailed information on configuration parameters, data models, and the REST/GraphQL APIs, check the NetBox official documentation.
FAQs
Is NetBox free to self-host?
Yes. NetBox Community is open source under the Apache 2.0 license, and the Docker images are free to pull and run on your own server.
Do I need Kubernetes to run NetBox?
No. Docker Compose is the standard and simplest way to self-host NetBox Docker IPAM.
Can NetBox track MikroTik routers specifically?
Yes. Add MikroTik hardware as a Device Type and map its interfaces, VLANs, and BGP-advertised prefixes into IPAM.

