
How to Configure Caddy as a Secure Reverse Proxy on a VPS
Deploy a Reverse Proxy with Caddy in a VPS Environment is an easy way to manage and secure your web applications. Caddy acts as a smart middle layer between the internet and your apps, which automatically handles tasks like routing requests and setting up HTTPS certificates.
This is an ideal option for developers who want a simple, reliable, and secure way to host multiple services on a single server without complicated configuration.
In this guide, from PerLod Hosting, you will learn how to set up Caddy on an Ubuntu VPS, which is best suited to deploy and manage applications with full control and performance.
Table of Contents
Prerequisites To Deploy a Reverse Proxy with Caddy in VPS Environment
We assume you have an Ubuntu 22.04 or 24.04 OS with root or sudo user access. You need a domain name that points to your VPS public IP. Also, you must set up a basic firewall and allow ports 80 and 443 through it.
Before you start to install and configure Caddy as a reverse proxy, run the system update and upgrade with the commands below:
sudo apt update
sudo apt upgrade -y
Install UFW and allow the required ports with the commands below:
sudo apt install ufw -y
sudo ufw allow openssh
sudo ufw allow 80/tcp
sudo ufw allow 443/tcp
Enable the UFW firewall with the command below:
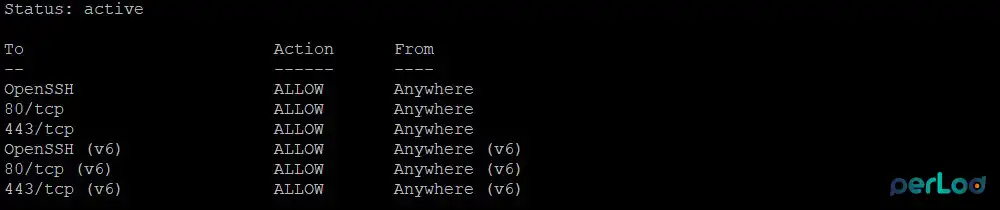
sudo ufw enableVerify your firewall status with:
sudo ufw statusYou must see something similar to this:
Step 1. Install Caddy From the Official Repository
The first step is to install Caddy from the official repository to get the most recent stable version. Install required packages and dependencies with the following command:
sudo apt install debian-keyring debian-archive-keyring apt-transport-https gnupg curl -yAdd the Caddy GPG key to your server with the following command:
curl -1sLf 'https://dl.cloudsmith.io/public/caddy/stable/gpg.key' \
| sudo gpg --dearmor -o /usr/share/keyrings/caddy-stable-archive-keyring.gpg
Then, add the Caddy repository to your server with the command below:
curl -1sLf 'https://dl.cloudsmith.io/public/caddy/stable/debian.deb.txt' \
| sudo tee /etc/apt/sources.list.d/caddy-stable.list
Run the system update to apply the new repository and install Caddy with the following commands:
sudo apt update
sudo apt install caddy -y
Caddy must be activated during the installation. To verify it, run the command below:
sudo systemctl status caddyIn your output, you must see:
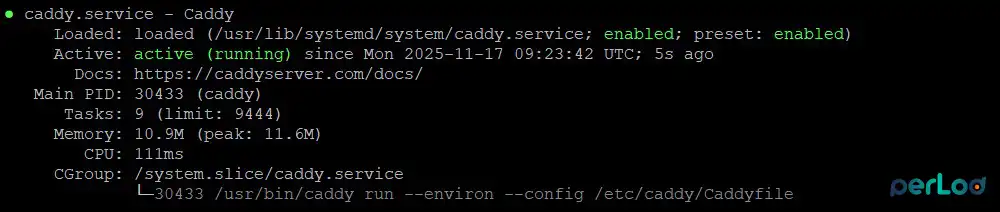
Also, to check if Caddy is working correctly, from your browser, you can access the Caddy default page:
http://YOUR_SERVER_IP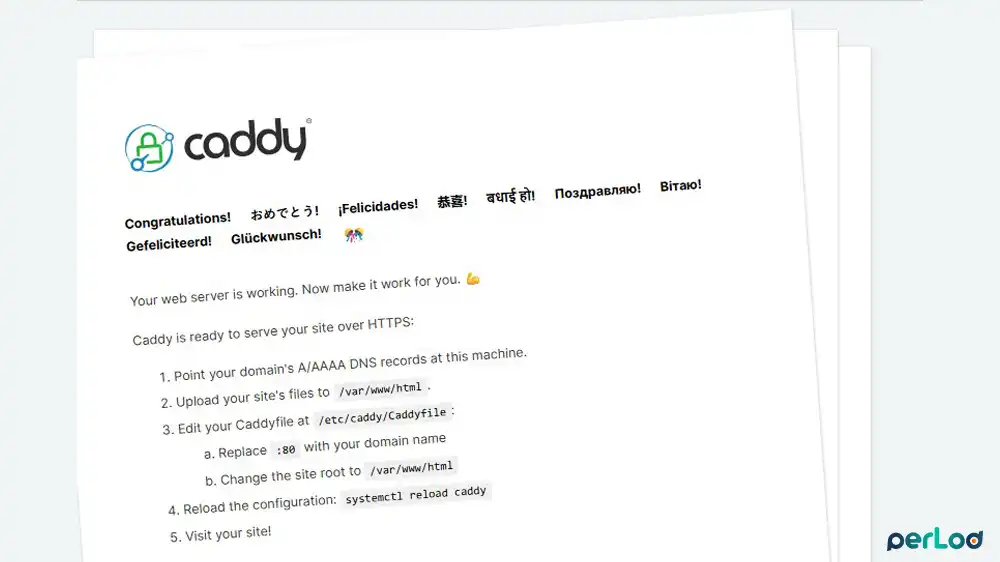
The main Caddy config file is located under:
/etc/caddy/CaddyfileThe default Caddyfile usually contains a simple HTTP site on port 80 pointing to /usr/share/caddy. We want to replace it with our configuration.
Step 2. Create a Test Python HTTP Server for Proxy
Before you start to configure Caddy reverse proxy, you need a backend application to proxy traffic to. In this step, we want to create a simple test server using Python’s built-in HTTP server. If you already have a running application, for example, on “127.0.0.1:3000“, you can skip this step and proceed.
Create a small test directory and navigate to it with the commands below:
sudo mkdir -p ~/testapp
cd ~/testapp
From the test directory, run the command below to create the test file:
sudo cat << 'EOF' > index.html
<!doctype html>
<html>
  <head><title>Caddy Reverse Proxy Test</title></head>
  <body>
    <h1>Served from the backend on port 3000</h1>
  </body>
</html>
EOF
Run the simple HTTP server on port 3000 with the command below:
sudo python3 -m http.server 3000Leave this running in your current terminal. Open another terminal and run the following curl command. You should see the HTML contents of the index.html file:
sudo curl http://127.0.0.1:3000Once you are done, close the new session and press CTRL+C to exit the running server.
Step 3. Set up Caddy As a Reverse Proxy For your Domain
Configuring Caddy as a reverse proxy will direct incoming traffic for your domain to the application on port 3000. It means when someone goes to “https://example.com“, the proxy requests to “127.0.0.1:3000“.
Open the Caddy default config file with your desired text editor:
sudo nano /etc/caddy/CaddyfileDelete the default content in the file and paste the following configuration into the file with your actual domain name:
example.com {
    reverse_proxy 127.0.0.1:3000

    encode zstd gzip

    header {
        Strict-Transport-Security "max-age=31536000; includeSubDomains; preload"
        X-Frame-Options "SAMEORIGIN"
        X-Content-Type-Options "nosniff"
        Referrer-Policy "strict-origin-when-cross-origin"
    }

    log {
        output file /var/log/caddy/example.com.access.log
        format console
    }
}
Once you are done, save and close the file. Validate your configuration with the command below:
sudo caddy validate --config /etc/caddy/CaddyfileIf everything is correct, you should see the following message:
Valid configurationReload Caddy to apply the changes:
sudo systemctl reload caddyCaddy will request a Let’s Encrypt certificate for your domain and start serving HTTPS. You can test from your browser:
https://example.comYou should see the HTML built by the Python server, but delivered through Caddy with HTTPS.
You can also test from the server with the command below:
curl -k https://example.comHost Multiple Services and Subdomains with Caddy
One of the most powerful features in Caddy is to host multiple services behind a single instance. For example, you might have your main application, a separate API, and a monitoring dashboard all running on different ports. Caddy makes it simple to configure this by automatically obtaining and managing HTTPS certificates for every subdomain.
- example.com: Main app on 127.0.0.1:3000
- api.example.com: API app on 127.0.0.1:4000
- monitor.example.com: Monitoring dashboard on 127.0.0.1:9000
In the Caddyfile, you must add:
example.com {
    reverse_proxy 127.0.0.1:3000
}

api.example.com {
    reverse_proxy 127.0.0.1:4000
}

monitor.example.com {
    reverse_proxy 127.0.0.1:9000
}
Remember to point your domains to your VPS’s public IP address.
Validate and reload the Caddy:
sudo caddy validate --config /etc/caddy/Caddyfile
sudo systemctl reload caddy
Caddy will automatically get certificates for all three domains, manage renewals, and proxy each to its backend.
Path-Based Routing with Caddy Reverse Proxy
Path-based routing with Caddy reverse proxy allows you to host multiple services on a single domain, where different paths are proxied to different backend applications.
For example, you can send all requests to /api/* to a dedicated API server while directing all other traffic to your main web application.
https://example.com/: Main app on port 3000https://example.com/api/: API app on port 4000
In the Caddyfile:
example.com {
    @api path /api/*

    handle @api {
        reverse_proxy 127.0.0.1:4000
    }

    handle {
        reverse_proxy 127.0.0.1:3000
    }
}
Use Caddy Reverse Proxy for Docker Containers
You can configure Caddy to route traffic directly to your containers using their service names. This requires that Caddy can resolve the container names, which is typically achieved by running Caddy on the same Docker network as your application containers.
You can route traffic with:
example.com {
    reverse_proxy myapp:8080
}
Monitor and Troubleshoot Caddy Service
A powerful setup includes knowing how to monitor and troubleshoot your services. In this step, you will learn to read Caddy’s logs and systematically check for the most frequent causes of proxy failures, from DNS to firewall rules.
Check real-time logs for the Caddy service with the command below:
sudo journalctl -u caddy -fLook for certificate errors, such as DNS misconfiguration, port 80 being blocked, etc. Check Caddyfile syntax errors if reload fails.
Check access logs with the command below, if you enable the log directive:
sudo tail -f /var/log/caddy/example.com.access.logDNS not pointing to VPS:
Make sure your domain points to your VPS IP. You can use the dig or nslookup command to verify it.
Port 80 or 443 blocked:
You must allow ports 80 and 443 through your firewall:
sudo ufw allow 80/tcp
sudo ufw allow 443/tcp
Caddyfile syntax error:
Always run sudo caddy validate --config /etc/caddy/Caddyfile before reload. and fix errors reported by the validator.
Backend not reachable:
From the VPS, test the backend directly with the command below:
curl http://127.0.0.1:3000If this fails, Caddy cannot proxy to it either.
Advanced Caddy Features for Reverse Proxy
Caddy offers a suite of features to enhance security, usability, and control. In this step, you will learn common enhancements such as canonical redirects, protecting routes with basic authentication, and an introduction to implementing rate limiting.
Redirect www to non www: You can automatically redirect all traffic from the www subdomain to your primary domain with:
www.example.com {
    redir https://example.com{uri}
}

example.com {
    reverse_proxy 127.0.0.1:3000
}
Rate limiting: Caddy v2 has a feature called rate_limit, but it is provided through optional modules. This means it is not built into Caddy by default; you can add it if you need it. The Caddy documentation and some third-party plugins show examples of how to use it.
For most real-world servers, you can also control rate limits in other places, such as:
- Your application.
- A WAF (Web Application Firewall).
So, you can use Caddy’s modules if you want rate limiting, but it’s also common to handle rate limiting outside of Caddy.
Basic Authentication for a Private App: If you want to protect a private dashboard or internal tool with a username and password, Caddy can do it using basic authentication with a secure hash. To generate a secure hash, you can run the command below:
caddy hash-password --plaintext 'YourStrongPassword'Use this hash inside the basicauth block:
monitor.example.com {
    basicauth / admin {
        JDJhJDEwJHhhdEZyYW1lZEhlcmVfQmNFbmNvZGVkUGFzc3dvcmQ=
    }

    reverse_proxy 127.0.0.1:9000
}
That’s it, you are done. You have learned to deploy a reverse proxy with Caddy on VPS environment running an Ubuntu OS.
FAQs
Can Caddy work with multiple backend applications?
Yes. Caddy can reverse proxy multiple domains, subdomains, or even different paths on the same domain to different backend applications.
Can I run Caddy with Docker containers?
Yes. Caddy can reverse proxy to containers either by using container names within a Docker network or by using the container’s IP and port.
How does Caddy handle HTTPS certificates?
Caddy automatically requests and renews free SSL/TLS certificates from Let’s Encrypt for domains it serves. You do not need to manually configure certificates.
Conclusion
Caddy provides a modern and secure way to serve web applications behind a reverse proxy. Its automatic HTTPS, great Caddyfile syntax, and built-in features like compression, security headers, and logging make it an excellent choice for both small projects and production deployments.
You can explore our Flexible VPS Hosting Plans, which are optimized for performance, reliability, and seamless deployment of modern web applications.
We hope you enjoy this guide. Subscribe to our X and Facebook channels to get the latest articles on reverse proxy and VPS hosting.
For further reading:
Optimize Nginx with PHP-FPM for faster response times
