How to Install Authentik with Docker Compose for SSO Across Self-Hosted Apps
If you run multiple self-hosted apps and you’re tired of logging in to each one separately, it’s time to set up a single sign-on system. In this guide, you’ll learn how to install Authentik with Docker Compose and use it to protect your apps with one central login.
Table of Contents
What Is Authentik?
Authentik is an open-source identity provider (IdP) that gives you SSO, OAuth2/OIDC, SAML, and LDAP in one place. You control all user data, all login flows, and all policies. It runs as a set of Docker containers and fits perfectly on a Linux VPS.
The stack has four main pieces:
- PostgreSQL: Stores all user data, apps, and configuration.
- Redis: Handles sessions and background task queues.
- Server: The main Authentik process that handles logins and the web UI.
- Worker: Runs background jobs like outpost management and email sending.
Requirements to Install Authentik with Docker Compose
To install Authentik with Docker Compose, make sure your server has:
- At least 2 CPU cores and 2 GB of RAM.
- Ubuntu 22.04 or newer is running.
- Docker and Docker Compose v2 are installed.
- A domain name pointing to your server, which is needed for reverse proxy and SSL.
- Ports 80 and 443 are open in your firewall.
A fresh Linux VPS is the perfect place to run this. You get a dedicated IP, full root access, and full control over what runs on the machine.
Step 1: Prepare Your Server for Authentik Setup
SSH into your server and update the system with the command below:
sudo apt update && sudo apt upgrade -yInstall Docker if it’s not already installed:
curl -fsSL https://get.docker.com | sh
sudo usermod -aG docker $USER
newgrp docker
Verify Docker Compose is working:
docker compose versionYou should see Docker Compose version v2 or higher.
Step 2: Create the Authentik Directory
You must create a dedicated folder for Authentik and navigate into it with the command below:
mkdir /opt/authentik && cd /opt/authentikStep 3: Download the Authentik Docker Compose File
The official Authentik project provides a ready-to-use Docker Compose file. You can download it with the following command:
wget https://goauthentik.io/docker-compose.ymlThis gives you a docker-compose.yml file that defines all four services, including PostgreSQL, Redis, server, and worker.
Here’s what the file looks like:
---
services:
  postgresql:
    image: docker.io/library/postgres:16-alpine
    restart: unless-stopped
    healthcheck:
      test: ["CMD-SHELL", "pg_isready -d $${POSTGRES_DB} -U $${POSTGRES_USER}"]
      start_period: 20s
      interval: 30s
      retries: 5
      timeout: 5s
    volumes:
      - database:/var/lib/postgresql/data
    environment:
      POSTGRES_PASSWORD: ${PG_PASS:?database password required}
      POSTGRES_USER: ${PG_USER:-authentik}
      POSTGRES_DB: ${PG_DB:-authentik}
    env_file:
      - .env

  redis:
    image: docker.io/library/redis:alpine
    command: --save 60 1 --loglevel warning
    restart: unless-stopped
    healthcheck:
      test: ["CMD-SHELL", "redis-cli ping | grep PONG"]
      start_period: 20s
      interval: 30s
      retries: 5
      timeout: 3s
    volumes:
      - redis:/data

  server:
    image: ${AUTHENTIK_IMAGE:-ghcr.io/goauthentik/server}:${AUTHENTIK_TAG:-2025.6.4}
    restart: unless-stopped
    command: server
    environment:
      AUTHENTIK_SECRET_KEY: ${AUTHENTIK_SECRET_KEY:?secret key required}
      AUTHENTIK_REDIS__HOST: redis
      AUTHENTIK_POSTGRESQL__HOST: postgresql
      AUTHENTIK_POSTGRESQL__USER: ${PG_USER:-authentik}
      AUTHENTIK_POSTGRESQL__NAME: ${PG_DB:-authentik}
      AUTHENTIK_POSTGRESQL__PASSWORD: ${PG_PASS}
    volumes:
      - ./media:/media
      - ./custom-templates:/templates
    env_file:
      - .env
    ports:
      - "${COMPOSE_PORT_HTTP:-9000}:9000"
      - "${COMPOSE_PORT_HTTPS:-9443}:9443"
    depends_on:
      postgresql:
        condition: service_healthy
      redis:
        condition: service_healthy

  worker:
    image: ${AUTHENTIK_IMAGE:-ghcr.io/goauthentik/server}:${AUTHENTIK_TAG:-2025.6.4}
    restart: unless-stopped
    command: worker
    environment:
      AUTHENTIK_SECRET_KEY: ${AUTHENTIK_SECRET_KEY:?secret key required}
      AUTHENTIK_REDIS__HOST: redis
      AUTHENTIK_POSTGRESQL__HOST: postgresql
      AUTHENTIK_POSTGRESQL__USER: ${PG_USER:-authentik}
      AUTHENTIK_POSTGRESQL__NAME: ${PG_DB:-authentik}
      AUTHENTIK_POSTGRESQL__PASSWORD: ${PG_PASS}
    user: root
    volumes:
      - /var/run/docker.sock:/var/run/docker.sock
      - ./media:/media
      - ./certs:/certs
      - ./custom-templates:/templates
    env_file:
      - .env
    depends_on:
      postgresql:
        condition: service_healthy
      redis:
        condition: service_healthy

volumes:
  database:
    driver: local
  redis:
driver: localNote: The database and redis named volumes handle persistent storage automatically. Your data survives container restarts.
Step 4: Generate Secrets and Create the .env File for Authentik
Authentik needs a strong PostgreSQL password and a secret key. You can run these two commands to generate them and write them directly to your .env file:
echo "PG_PASS=$(openssl rand -base64 36 | tr -d '\n')" >> .env
echo "AUTHENTIK_SECRET_KEY=$(openssl rand -base64 60 | tr -d '\n')" >> .env
Important Note: PostgreSQL does not support passwords longer than 99 characters. The command above uses base64-36, which stays well within that limit.
Add Email Settings
Email is optional but highly recommended. Authentik uses it to send password reset links, admin alerts, and verification emails. Append this block to your .env file:
cat >> .env << 'EOF'
# SMTP Settings
AUTHENTIK_EMAIL__HOST=smtp.yourdomain.com
AUTHENTIK_EMAIL__PORT=587
AUTHENTIK_EMAIL__USERNAME=yo*@********in.com
AUTHENTIK_EMAIL__PASSWORD=your_smtp_password
AUTHENTIK_EMAIL__USE_TLS=true
AUTHENTIK_EMAIL__USE_SSL=false
AUTHENTIK_EMAIL__TIMEOUT=10
AUTHENTIK_EMAIL__FROM=au*******@********in.com
EOF
Replace the values with your actual SMTP provider details.
Use Ports 80 and 443 (Optional)
If you want Authentik to listen directly on standard HTTP/HTTPS ports instead of 9000/9443, add these lines to the .env file:
COMPOSE_PORT_HTTP=80
COMPOSE_PORT_HTTPS=443
Step 5: Start Authentik Stack
At this point, you can pull the images and start all containers with the commands below:
docker compose pull
docker compose up -d
Give it about 60 seconds for the health checks to pass and the database migrations to complete. Then, check the logs to confirm everything started cleanly:
docker compose logs -f serverLook for a line like Starting on port 9000, that’s your confirmation.
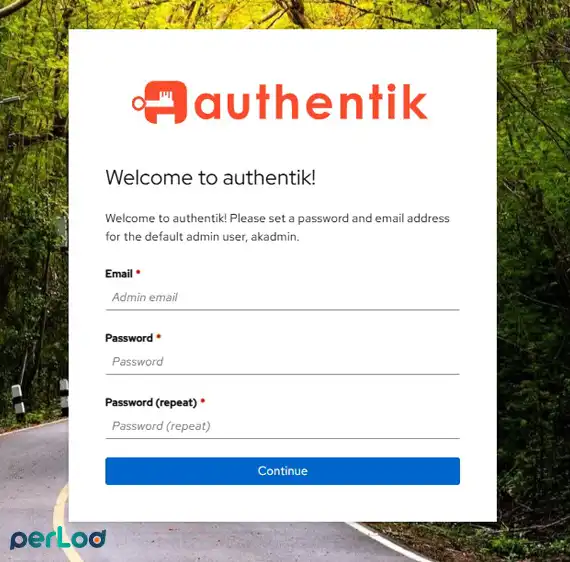
Step 6: First Login and Admin Setup for Authentik
Open your browser and go to:
http://your-server-ip:9000/if/flow/initial-setup/You’ll see a setup screen asking you to create the akadmin account. Set a strong password here; this is your main admin account.
After that, you’ll land on the Authentik admin interface at:
http://your-server-ip:9000/if/admin/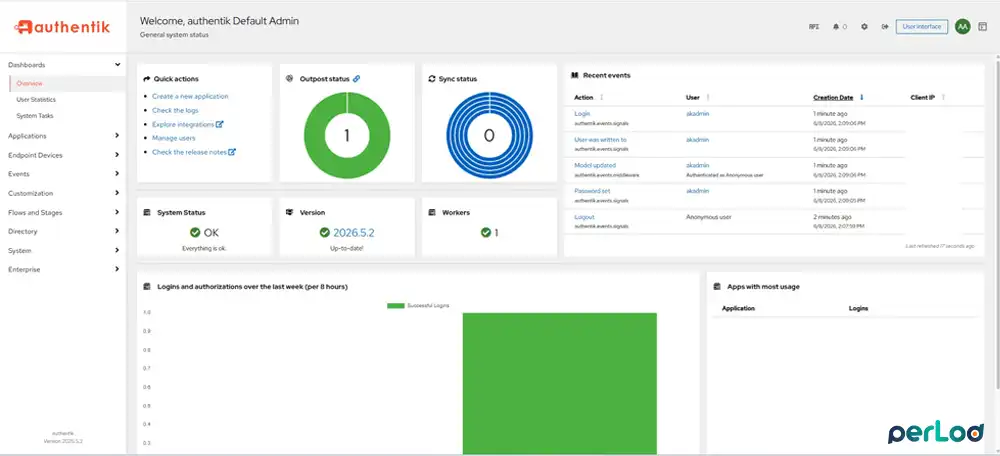
This is where you manage everything: users, groups, applications, providers, and outposts.
Step 7: Set Up a Reverse Proxy for Authentik with Nginx
Before protecting apps, you can put Authentik behind a proper reverse proxy with SSL. Here’s a basic Nginx config to put Authentik behind a domain.
You can easily register a domain from PerLod if you don’t have one.
Create the file:
sudo nano /etc/nginx/sites-available/authentikPaste this config with your domain:
server {
    listen 80;
    server_name auth.yourdomain.com;
    return 301 https://$host$request_uri;
}

server {
    listen 443 ssl http2;
    server_name auth.yourdomain.com;

    ssl_certificate /etc/letsencrypt/live/auth.yourdomain.com/fullchain.pem;
    ssl_certificate_key /etc/letsencrypt/live/auth.yourdomain.com/privkey.pem;

    # Increase buffer size for large headers
    proxy_buffers 8 16k;
    proxy_buffer_size 32k;

    location / {
        proxy_pass http://localhost:9000;
        proxy_set_header Host $host;
        proxy_set_header X-Real-IP $remote_addr;
        proxy_set_header X-Forwarded-For $proxy_add_x_forwarded_for;
        proxy_set_header X-Forwarded-Proto $scheme;
        proxy_http_version 1.1;
        proxy_set_header Upgrade $http_upgrade;
        proxy_set_header Connection "upgrade";
    }
}
Enable the site and get your SSL certificate with Certbot:
# Enable the site
sudo ln -s /etc/nginx/sites-available/authentik /etc/nginx/sites-enabled/

# Get SSL certificate
sudo certbot --nginx -d auth.yourdomain.com

# Test and reload
sudo nginx -t && sudo systemctl reload nginx
Step 8: Create Your Authentik First Provider and Application
Here’s how you can actually connect a real app to Authentik:
Create a Proxy Provider
A Provider tells Authentik how to authenticate users for a specific app. For forward auth, use the Proxy Provider.
- In the Authentik admin panel, go to Applications → Providers.
- Click New Provider.
- Select Proxy Provider and click Next.
- Fill in the details:
- Name: my-app-provider
- Authorization flow:
default-provider-authorization-implicit-consent - Mode: Select Forward auth (single application)
- External host:
https://myapp.yourdomain.com
- Click Create.
Create an Application
An Application connects your provider to a real URL.
- Go to Applications → Applications.
- Click New Application.
- Fill in:
- Name: My App
- Slug: my-app
- Provider: Select my-app-provider
- Click Create.
Deploy the Embedded Outpost
An Outpost is the actual authentication proxy that sits between your reverse proxy and Authentik. Authentik ships with an embedded outpost, so you don’t need to deploy anything extra.
- Go to Applications → Outposts.
- You’ll see a default outpost called Authentik Embedded Outpost.
- Click Edit.
- Under Applications, add your newly created application.
- Click Update.
Step 9: Protect a Sample App with Forward Auth
Now comes the part to protect a running app. Let’s say you have a simple app running at myapp.yourdomain.com on port 8080 internally.
Create the file:
sudo nano /etc/nginx/sites-available/myappAdd this Nginx config for your app’s domain:
server {
    listen 443 ssl http2;
    server_name myapp.yourdomain.com;

    ssl_certificate /etc/letsencrypt/live/myapp.yourdomain.com/fullchain.pem;
    ssl_certificate_key /etc/letsencrypt/live/myapp.yourdomain.com/privkey.pem;

    # Increase buffer size for large headers
    proxy_buffers 8 16k;
    proxy_buffer_size 32k;

    # Forward auth endpoint — handled by Authentik
    location /outpost.goauthentik.io {
        proxy_pass http://localhost:9000/outpost.goauthentik.io;
        proxy_set_header Host $host;
        proxy_set_header X-Real-IP $remote_addr;
        proxy_set_header X-Forwarded-For $proxy_add_x_forwarded_for;
        proxy_set_header X-Forwarded-Proto $scheme;
    }

    location / {
        # Check authentication with Authentik
        auth_request /outpost.goauthentik.io/auth/nginx;
        error_page 401 = @goauthentik_proxy_signin;

        # Pass Authentik headers to your app
        auth_request_set $auth_cookie $upstream_http_set_cookie;
        add_header Set-Cookie $auth_cookie;
        auth_request_set $authentik_username $upstream_http_x_authentik_username;
        auth_request_set $authentik_groups  $upstream_http_x_authentik_groups;
        auth_request_set $authentik_email   $upstream_http_x_authentik_email;

        # Proxy to your actual app
        proxy_pass http://localhost:8080;
        proxy_set_header Host $host;
        proxy_set_header X-Real-IP $remote_addr;
        proxy_set_header X-Forwarded-For $proxy_add_x_forwarded_for;
        proxy_set_header X-Forwarded-Proto $scheme;
    }

    location @goauthentik_proxy_signin {
        internal;
        add_header Set-Cookie $auth_cookie;
        return 302 /outpost.goauthentik.io/start?rd=$scheme://$http_host$request_uri;
    }
}
Enable it and get SSL:
# Enable the site
sudo ln -s /etc/nginx/sites-available/myapp /etc/nginx/sites-enabled/

# Get SSL certificate
sudo certbot --nginx -d myapp.yourdomain.com

# Test and reload
sudo nginx -t && sudo systemctl reload nginx
Now try visiting https://myapp.yourdomain.com in your browser. You’ll be redirected to the Authentik login page. After you log in, you’ll be sent right back to your app with the user’s identity passed in the X-authentik-username and X-authentik-email headers.
How Forward Auth Works
It’s worth understanding what’s happening in Forward Auth:
- Your browser requests
https://myapp.yourdomain.com. - Nginx intercepts the request and uses auth_request to ask Authentik: Is this session valid?
- If Authentik returns 200 OK, Nginx passes the request to your app along with the user’s identity headers.
- If Authentik returns 401, Nginx redirects the user to the Authentik login page.
- After a successful login, Authentik redirects back to the original URL.
Your app doesn’t need to know anything about authentication; Nginx handles it all.
Step 10: Add More Apps to Authentik with OAuth2/OIDC
For apps that natively support OAuth2 or OIDC, like Grafana, Nextcloud, Portainer, you can use the OAuth2/OpenID Provider instead of Proxy Provider.
- Go to Applications → Providers → New Provider.
- Select OAuth2/OpenID Provider.
- Fill in:
- Name: grafana-provider
- Authorization flow:
default-provider-authorization-explicit-consent - Client type: Confidential
- Redirect URIs:
https://grafana.yourdomain.com/login/generic_oauth
- Note the Client ID and Client Secret, paste these into your app’s OAuth config.
- Create an Application linked to this provider.
The OIDC discovery URL will be:
https://auth.yourdomain.com/application/o/your-app-slug/.well-known/openid-configurationStep 11: Create Users and Groups
To add a new user:
- Go to Directory → Users → New User → Internal User.
- Fill in username, name, and email.
- Set a password under the user’s Credentials tab.
To restrict an app to specific users, create a Group and assign it to the app’s Policy Bindings:
- Go to Directory → Groups → New Group.
- Name your group, for example, app-users.
- Add members.
- In your Application settings, go to Policy / Group / User Bindings and bind the group.
Step 12: Enable Authentik Multi-Factor Authentication (Optional)
Authentik supports TOTP like Google Authenticator and Authy, WebAuthn (hardware keys), and email-based MFA.
To turn on TOTP for all users:
- Go to Flows and Stages → Stages → New Stage.
- Select Authenticator Validation Stage.
- Enable TOTP under allowed devices.
- Add this stage to your authentication flow under Flows and Stages → Flows.
How to Update Authentik
To upgrade to a new version, you can easily download the latest Compose file and restart:
cd /opt/authentik
wget -O docker-compose.yml https://goauthentik.io/docker-compose.yml
docker compose pull
docker compose up -d
Always check the release notes before upgrading; some versions have migration steps.
For more detailed information and release changelog, you can visit the official Authentik documentation.
Conclusion
At this point, you have a working SSO layer protecting your self-hosted apps. You have learned to run an Authentik instance, create a provider and application, and set up forward auth so your app requires a login without changing a single line of app code.
We hope you enjoy this guide.
FAQs
What is Authentik used for?
Authentik is used to manage user logins across multiple self-hosted apps from one place using SSO, OAuth2, OIDC, and SAML.
Can I use Authentik without a domain name?
You can test it with an IP address on port 9000, but you’ll need a domain with SSL for real use with forward auth and OAuth redirects.
What is an Outpost in Authentik?
An Outpost is a small proxy service that handles the actual auth check requests from your reverse proxy. The embedded outpost runs inside Authentik itself.
What’s the difference between Proxy Provider and OAuth2 Provider in Authentik?
Proxy Provider is for apps that don’t know anything about auth, and Nginx handles everything. OAuth2 Provider is for apps that have built-in OAuth/OIDC login support and need a Client ID and Secret.
